Friday, March 29, 2013

Easter Egg Card

Wow, how did Easter sneak up on me? Time is zipping by and I have to stop.... and focus on the important things.  Easter is a very important day for us Christians. It is one of the two holy days (Christmas being the first one) that we love to celebrate. And I want to share this day with friends and family, so...

I made some Easter Cards that you might want to make too.

Today's project is:
Easter Egg Card
you will need:
white card stock
colored/printed card stock
brad
glue

You will want to make an egg pattern on scrap paper. Make sure it fits an envelope.

Then trace this egg onto the white card stock and the colored card stock.

Take your scissors and cut zig zags into the lower half to show the 'egg' cracking. You will glue this onto the bottom of the white egg.
Then take an exacto knife, or something likewise, and cut a slit into the top to put in the brad. This will enable the top half of the colored egg to open up to show the greeting.


You can also write a greeting onto the back of the egg.
I want to wish everyone a happy Easter and a wonderful new year since this is the beginning of Spring. Winter is ending and I'm thankful for that. I love the new flowers and buds and warm weather. So bring on shorts and flip flops.
tip of the day:
take your fabric softener sheet, and sew around three sides. Tuck in some lavender and sew around the remaining edge. Throw this into your dryer and your clothes will smell  wonderful! It should last several dryings.
 
That's all for now...
Dee

Friday, March 15, 2013

Tea for Two

I recently went to my neighbor's home and she offered me tea (since I don't drink coffee).
And she brought out a sweet little wooden box filled with a variety of tea bags.

We thought this was a great idea, and since I'm always trying to RECYCLE and REUSE and RENEW and upcycle and upgrade and whatever UP or RE prefixes you want to use...here's the project for today:

Wooden Decoupage Tea Box

You will need:
a wooden box, I used a cigar box (one of many that my hubby has donated to my projects)
ModPodge (a decoupage liquid) You could probably use a watered down Elmer's glue (?)
decorative papers (scrapbook papers, tea bags, hand drawn designs, newspapers,  OR really you can use any kind of paper.
scissors

First decide on your paper theme. I cut a piece of paper almost as large as the top of the box. I adhered this down, first brush ModPodge onto the box, then put the paper on it, and smear more ModPodge on top of this.
Then I cut several pieces, mostly triangles, of related paper design. Here I chose a paisley design, plus I cut out the fronts of 3 decoratively designed tea bags.

I mainly worked on the top of the box, but you can certainly cover all the sides. You have to smooth the ModPodge over, but be careful you don't overwork it. The paper may tear. But if it does, just decoupage a piece of paper over it. (Don't cover over the box opening edges.)

I worked on a laminated placemat to protect my table. And the ModPodge stinks, so take a break now and then and get away from it. Working in a ventilated area is important. So get out of the closet and move into the living room.

After I covered the top, I used my brush to stipple all over the top (pounding down using only the tips of the bristles). Then put that stinky thing outside to dry a bit.  Then I used my rolling pin with a piece of wax paper under it, and rolled all over it to smooth out bubbles.

When it is all dried, I added a variety of teas. What a great gift for those of us who are tea drinkers. I guess you could do the same for coffee drinkers, and put in those individual coffee packs. That would be nice too.

tip of the day:
Make a little card to match the box. Add a tea bag to the front, some of the same decorative paper and you have a wonderful gift!

That's all for now....
:D

Friday, March 8, 2013

Lady bug pouch

I've been playing around with different ideas for my cell phone accessory pouch.
A couple of posts ago, I gave you directions to make a turtle.

And today it's going to be a ladybug.  Both shapes lend themselves well to the round pouch. And they are soooo cute, I can't stop...

Today's project is:
Lady Bug Pouch
You will need:
black felt
red fleece, or red cotton fabric
black ribbon
black cotton fabric
black zipper
fabric glue

First you will cut 2 black circles, and one red circle. I used an old DVD. It's the perfect size to use as a template. Cut one black circle in half, and the red circle in half.

 Iron a small 1/4" hem into the straight edge of the black fabric. This will be pinned, then stitched to the zipper. This is bottom of the bug.

Now if you have red fleece, there is no need to fold under the straight edge, but if you have plain cotton fabric, you should iron down the edge to the 'wrong' side of the fabric about 1/4 "

With the red fabric, open slightly at an angle to look like ladybug wings and lay on the black circle. Right sides are both facing up. Now you will pin down and stitch along the straight edge of the red fabric.  This is the top of the bug.

With the felt, you will cut out 6 small circles (about  1/2" wide) and one larger oval (about 2" long and  1" wide) for the head.  Cut about a 1 1/2" length of narrow ribbon also.

With right sides together, you will "sandwich" the head inside the two body parts, with the bulk of the oval INSIDE. Make sure it is at the top, where the red fabric comes to a point. At the opposite end, fold the ribbon in half, and lay it INSIDE with the two ends peeking out.

At the illustration here.......^
I used a red zipper and ladybug fabric for the bottom. The black on black was too hard to see.
Plus, I trimmed the oval head, yours should be peeking out a bit more.

IMPORTANT: un-zip the the zipper so it is halfway open, before you sew around the perimeter!  That way you can turn it right side out. Also, if you have a super long zipper, you can trim it now, with old scissors, if the teeth are metal. Never use your good fabric scissors to do this.

Stitch around the lady bug "sandwich", trim excess fabric outside of your stitch lines. Turn it right side out. Put a popsicle stick, or dull pencil, or chopstick inside the bug, and drag around the inside edge to ease the fabric out to it's fullest.

Now last touch is to glue the black felt circles onto the wings. If you want to wash this pouch in the future, you must use fabric glue that is washable. If you don't think you will be washing it, Tacky glue will work fine.  I added a split ring onto the ribbon 'tail', but that's optional.

Now it's ready for anything you want to put into it. I use it for my cell phone recharging plug. My daughter uses hers for her earbud earphones. My other daughter uses it for her small sewing notions. Like replacable needles (see tip below)
I think you'll find lots of uses for the cute little guy.

tip of the day:
My friend Sheila, gave me a great tip for you sewing ladies. Different size needles have TINY numbers on them, sometimes very hard to read, so she puts different colors of nail polish on the ends, for the different sizes. You can brush a small dot on the side of your sewing machine and use a Sharpie Marker to write the needle size next to it.  Or paint this on a piece of white cardboard and keep it with your needles. Happy sewing!

That's all for now...
:D


Friday, March 1, 2013

fire it up

It's March, and I guess that means the start of spring? Not by us, 3000 feet above sea level in the foothills of the Sierra Nevada mountains.  In other words, you never know when you will get cold and snow.

So we drive with our chains in the car, and flip flops in the back. The weather is very unpredictable. We have to be ready for anything. So when the weather is good, I go out in my yard and collect pine cones. These make wonderful 'fire bombs' in our wood burning stove, for when the weather turns baaaaaaaad. And we have our wood burning stove going all day and night.

Since my hubby cuts wood for our wood burning stove, I have plenty of saw dust which works great in this project....

Today's project is:
Pine Cone Fire Starters

You will need:
pine cones
wax (can be bought in a slab, or us your old candles)
sawdust or cut up pine needles or small dried wood chips
cupcake papers

These little beauties are a wonderful way to use the natural items we have around us. They are natural and very effective. IF you don't live the country, look into hiking into some of your surrounding areas that have pine trees. Not only will you have a wonderful afternoon walking in the beautiful countryside, but you will be able to collect those wonderful pine cones.

To melt the wax, you can use an old metal coffee can, filled with old candle stubs, or wax from the craft store. Put this can into a larger pot filled with water and boil up the water to melt the wax. You have to watch this constantly, because wax can flame up. I actually put this can onto my wood burning stove top and let the heat do all the work to melt the wax.

Put some of the sawdust or small wood chips or pine needles into a cupcake paper.  Take a bowl, covered with aluminum foil, and place the cupcake paper in here. This way, if the wax seeps out, it will go into the foil covered bowl and no mess on your counter.

When the wax melts, take an old rag and grab the coffee can and pour the wax into the cupcake holder about 3/4 full. I cover my work space with newspapers to catch any stray wax drippings.
Take a pine cone and place it into the middle of the cupcake paper. Let this cool.

You can have several bowls covered with foil and ready to go to hold the starter materials.

When this cools, you will have a wonderful way to start your fire without tons of paper.
Just light the paper of the cupcake holder and the dried pinecone will start your kindling and small logs in the fire. And if you used candles with scents, you might even get a little fragrance in your fire. These make nice gifts (for others who have fireplaces or wood burning stoves). Place them in an old basket you find at the thrift shop, a long arm lighter (you can find at the Dollar Store), amd some hot chocolate mix packages.

tip of the day:
If you sew, and have several needles, my friend Sheila gave me a great tip. The numbers on these needles can be so small and hard to read, so she paints the tips with different colored nailpolish so she can tell which needle is which. Put a little blot of paint onto a piece of cardboard with number of the needle in large numbers and store with the needles.

That's all for now....
:D

Friday, February 22, 2013

turtle pouch

I love to be organized.
I love to have all my papers, cords, cards, lists, coins, coupons, etc. in their own little places.

I have some great little organizers on my Etsy site: ArtToWearByDee.etsy.com

Check it out, there are small shopping bag/store card holders that are perfect for today.
So many places now are discouraging or charging for bags, so now you can have your own bags, in the same place as your store cards. Whip out the card, whip out the bag.

Also I have a bag for your purse that unfolds into a larger bag for those unexpected shopping purchases. I use mine all the time. It's really funny, how many places I go to and buy a little something, but don't want one more plastic sack.

And now I have these adorable little turtle pouches perfect for your smaller goodies. Cell phone earbuds, or recharging cords. Or even change, charge cards, etc. They are so cute, you will want one to have just to look at.

Today's project:
TURTLE POUCHES

You will need:
cotton fabric, scraps or recycled
zipper (can be taken from an old piece)
felt
2" ribbon

This will require some sewing knowledge. But once you get it down, you will be making these cute creatures by the dozen...

Get some fabric that is  at least a foot across
fold in half and cut a circle out that is approx. 6" across. I used a small bowl to measure.
You will take one of these circles and cut it in half. To these halves you will be sewing a zipper into them. Fold raw edge down and pin to zipper and then sew. If the zipper is longer, don't worry, we will cut off the excess later.


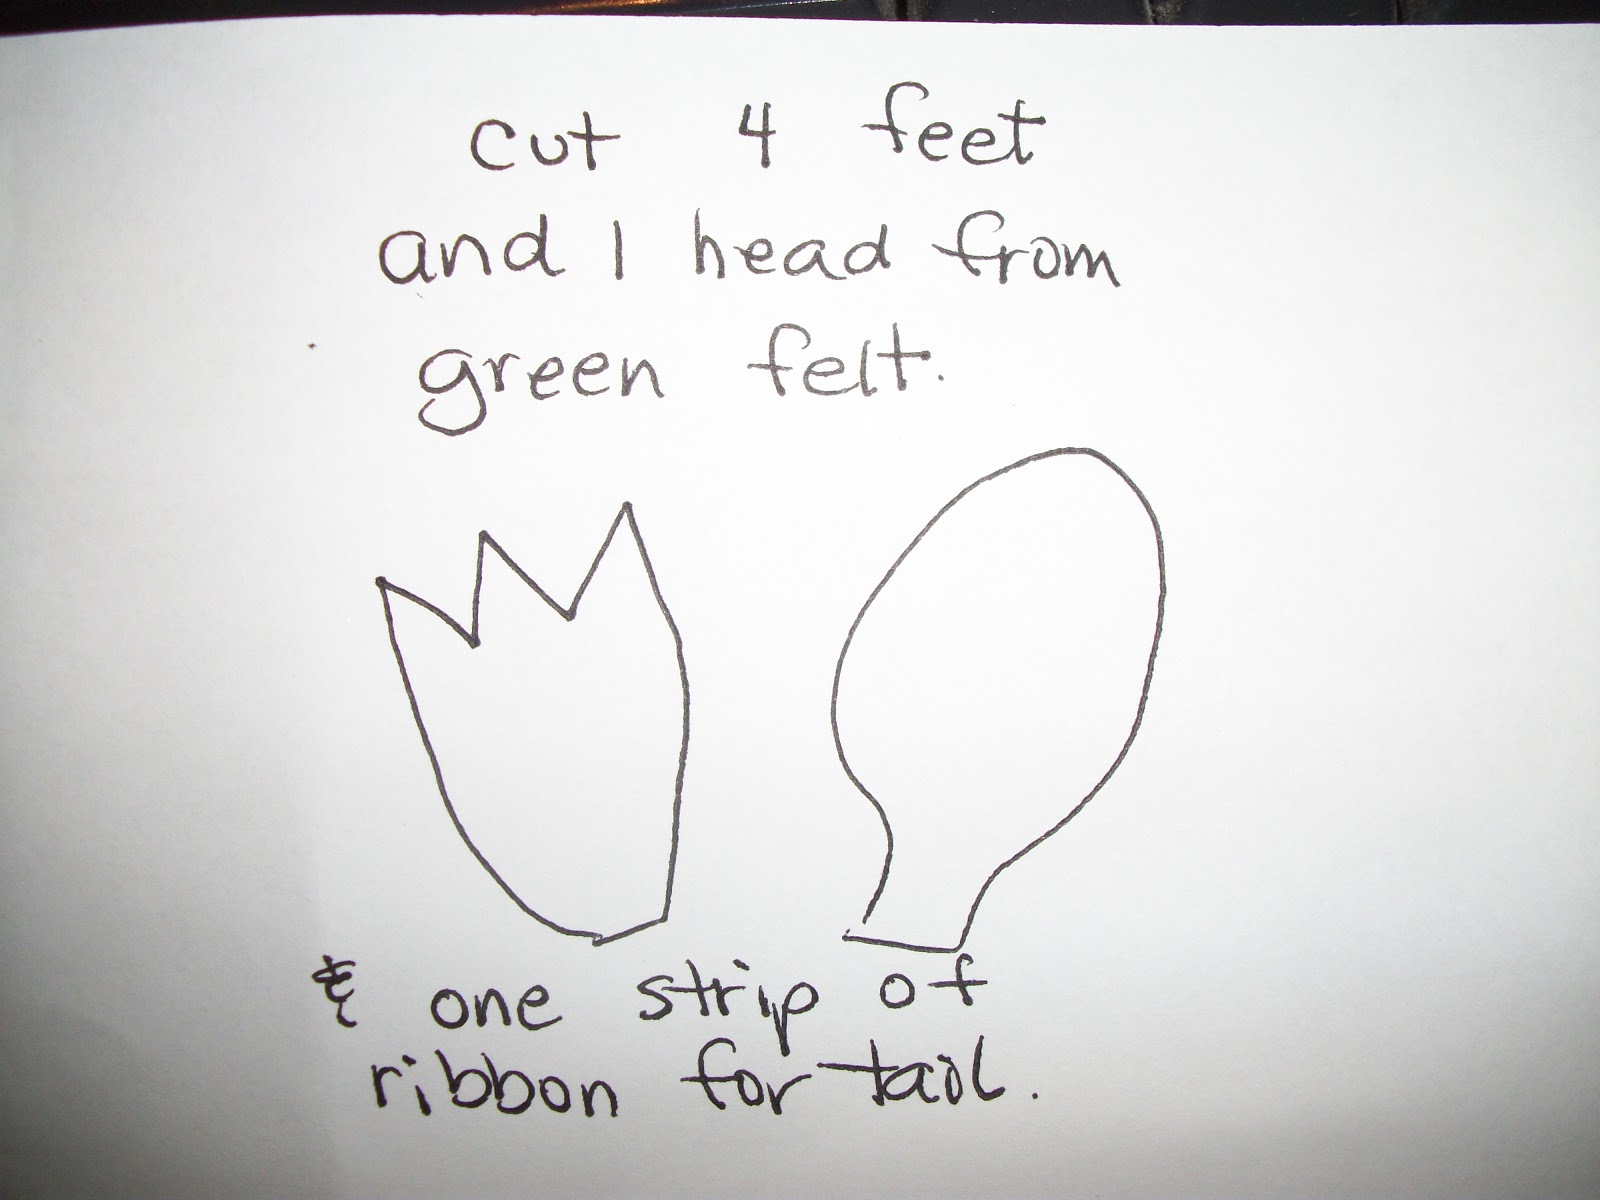
Now you are going to cut felt pieces to look like legs and a head.
Now you will assemble the two body parts. Take the head and feet and place inside, the two big circles are facing each other with right sides in.


 Don't forget the little ribbon piece that you will fold in half and place at the opposite end of the head. Folded end on the INSIDE of the circle.
You will be facing the feet inside, so when you turn this guy inside out, they will be sticking out. Also remember to open the zipper 1/2 way, or you will not be able to turn this turtle right side out. After you sew, cut off any ends of an extra too long zipper, using an old pair of scissors.
 Then trim the raw edges and turn right side out.
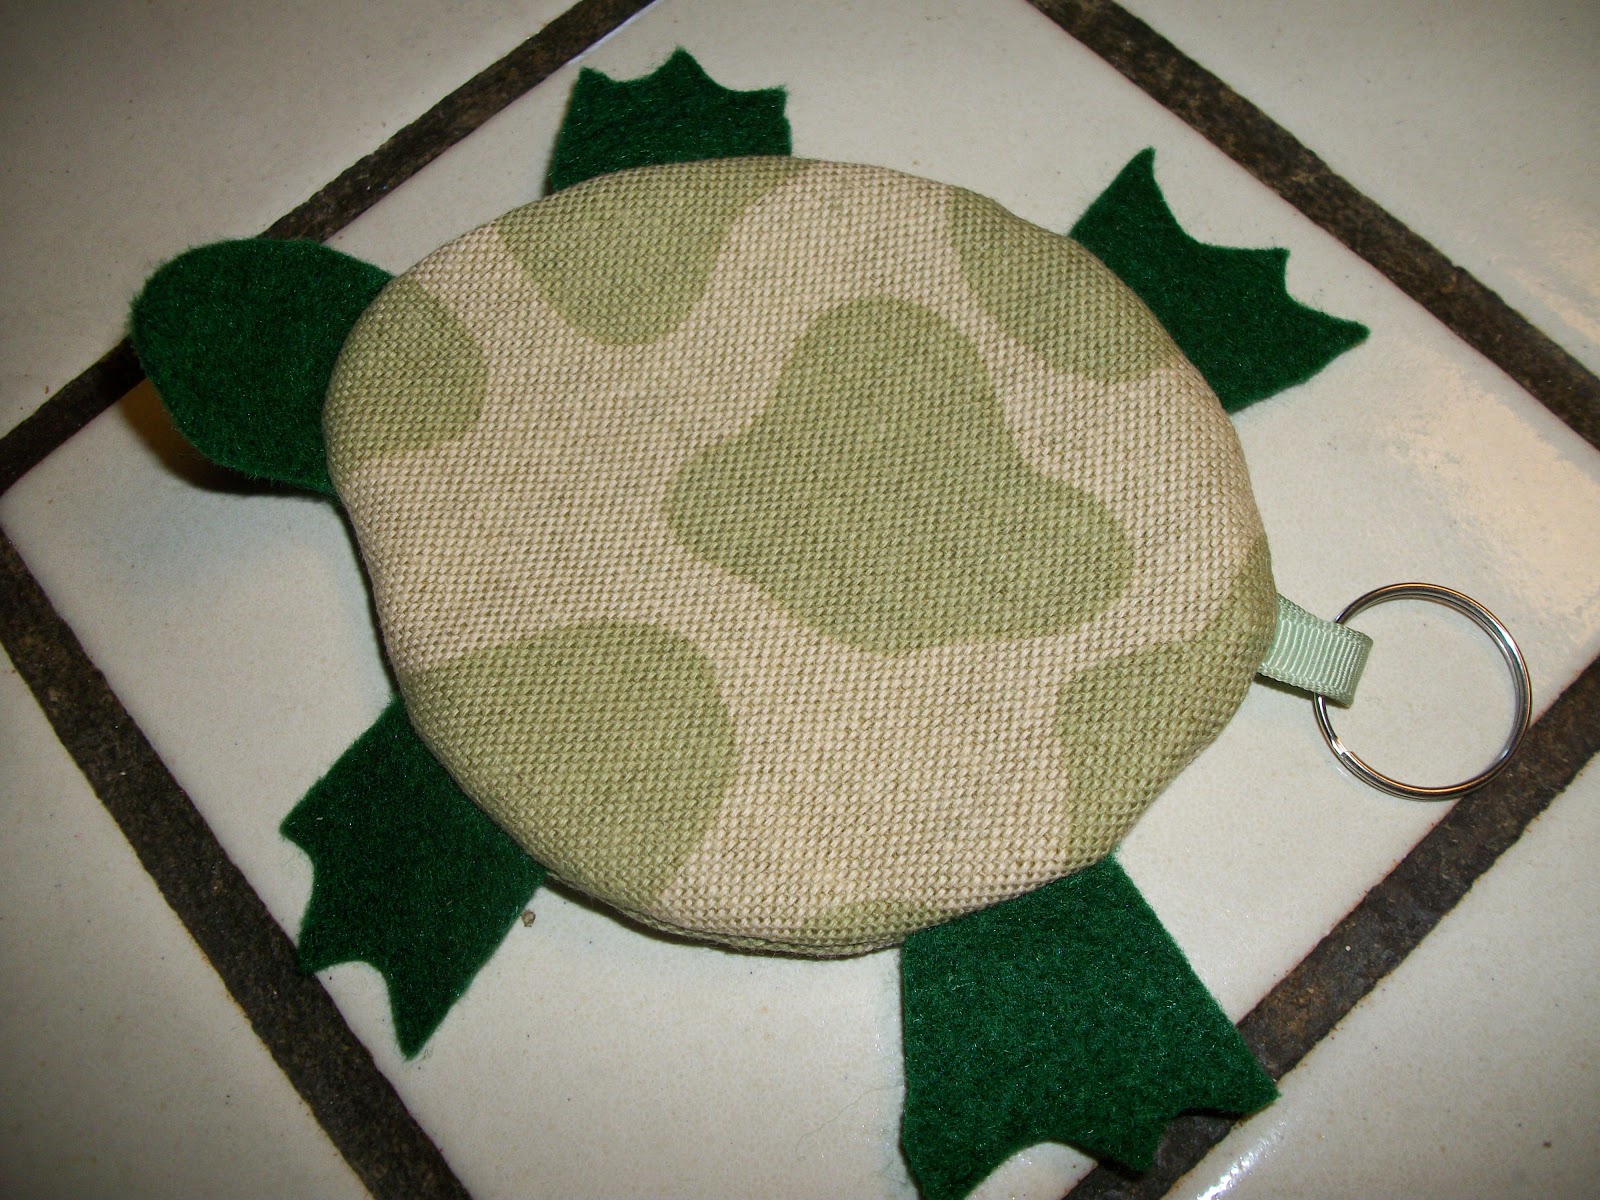
It should look like this:
I added a key ring to the 'tail' in case I wanted to add it to my purse, or key chain, or belt loop.

Tip of the day:
If your pencil's eraser gets all shiny and doesn't erase anymore, try to give it a bit of a filing with an emery board. This will shave off that shiny surface, and then you can erase that ONE little mistake you made (because you don't make a lot of them, right?  :)

That's all for this week...
:D

Friday, February 15, 2013

Infinity scarf

The weather has been pretty chilly lately, and I hate being cold around my neck, so I made a bunch of casual, cotton infinity scarves. Luckily my neighbor cleaned out his closet and I got some nice color variety. Scarves are a great way to add a little something extra to a plain outfit. And these simple loops go great with T-shirts and jeans.

Today's project is:

T-shirt Infinity Scarf

You will need:
a t-shirt, extra large is best
(You can find t-shirts at thrift shops, raid your neighbor's closet or buy them cheaply in a 3 pack at Walmart)
scissors

You will cut the bottom hem off the t-shirt. Then cut about 12"  - 14" up (approx.) This should be under the sleeves.

Then holding this round loop, put your foot down on the end, and pull and stretch the top upward. Be strong!
As you do this, the fabric will curl inward, so you don't need to hem this. The T-shirt fabric will not fray.

Now you have a naturally folded loop, double it up around your neck, and voila, instant fun accessory as well as keeping you cozy.

Use the rest of the shirt for rags. Cotton t-shirt fabric is nice and soft and absorbant.

tip of the day:
Buy some Altoid mints and save those great metal tins. They are good for so many things. Small sewing notions, travel jewelry case, store cards fit in them (how do we accumulate so many of those things?). If you need a small 'wallet', use one of these tins. Your credit card, coins and cash fit in nicely plus a couple of keys (without a big keychain). Stash in your pocket and off you go!

That's all for now...
:D

Friday, February 8, 2013

bottle gift bag

I was given a bag full of fabric samples, and each one had two grommets in them. So I put my brain to work, and came up with today's project of recycled fabric...
This can be used with wine bottles, olive oil, or flavored vinegars. It's a great hostess gift

Wine Bottle gift bag
you will need:
fabric, ribbon (about 18"), sewing machine or hand stitching

The sample was the perfect size for a wine bottle. But you could use these for olive oil or flavored vinegar, etc.  But the problem was that the grommets were too close to the top.  So I folded down the top and stitched the bottom edge. Also I stitched 1 inch above this to form a casing to put the ribbon through.

Then turn it inside out, and stitch along the side and bottom. Turn inside out and then take a ribbon, add a safety pin onto the end, and feed it through one of the grommets until you come to the second grommet and come out. Pull ribbon through until the ends meet.

When you go to a friend's for dinner, or for a special occasion, put a nice bottle of wine in here, tie ribbon tightly with a bow, and surprise your hosts with a wonderful, REUSABLE, bag. Or when you go to BYOB gathering, you can transport your wine in style. White, chilled wine will stay cooler longer and as it 'sweats' the bag will help with that.

(IF you don't have samples with grommets, you can use a piece of fabric, cut 15" x 13". Fold down the top, double and stitch a nice clean edge. Fold 'right sides in' and catch a ribbon, that has been folded in half, as you sew the side seam so when you turn it inside out, the ribbon will stick out and you can tie it up that way.)

today's tip is:
keeping a package of floss in your purse can come in very handy. Not only can you keep your teeth clean after meals out, but I have needed a string to tie something with in a pinch, and floss is strong and handy.

That's all for now...
Dee