Showing posts with label fabric. Show all posts

Monday, April 4, 2016

Cell Phone Holder

Keep misplacing your phone at home?
It needs a nest to rest in. And also can allow you to be 'hands free'.


Here are the instructions to make your own Cell Phone Buddha (as my daughter calls it)

1. You need a piece of fabric ( I used cotton) 15" X 12". Or two pieces measuring: 15" X 6"

2. Sew wrong sides together to form a tube (with one open end).

3. Turn right side out and grab a handful of stuffing, cotton or even a plastic grocery bag. Stuff into the tube making sure to get in the corners.
Then pour in about a cup of dried beans, rice or peas.


4. This is the trickiest part. Although it's not THAT tricky.
If you used two pieces of fabric, you will have two seams. Line these up and pin close to the bean stuffing.  If you used one piece and folded it up, you will have only one seam. So now you have to manipulate the fabric until this one seam is in the middle of the tube.
5. So now you have to pin across the fabric, containing the beans in while you stitch across.
 
6. Now you will roll up the 'open' end, first folding corners in, and then roll up tightly until you get to the stitching line. Pin both ends to hold, while you hand stitch the roll edges together.
 
7. This will create a little 'lip' for your phone to rest in. And now you are done!


Friday, August 30, 2013

Recycled Store Hanger

You know those hangers you get when you buy pants or lingerie?  (undies to the rest of us)
They have two clips at the end, short hanger, plastic, presumably useless after you take off the underpants and toss the hanger in the garbage or you tell the cashier to keep 'em!

STOP!  This lowly little hanger can do so much more. #1...If you take pliers and pry off the two ends where the clips are...you have two strong clips that can be used for chips, bags, etc. Smoosh, break, file or whatever it takes to give you a smooth edge.

#2~Then...the little wimpy hanger that is left can be turned into an infant clothes hanger! Brilliant!!!

Today's project:
recycled hanger
What you need is:
store hanger
pliers
batting
fabric
ribbon
 First go out and get some new undies. You know you need them. Splurge! or buy some new pants, winter is on its way. (OR just go into the store and ask for those hangers.)
 
Keep ALL the hangers they come on. Take pliers and bend, bend, re-bend in the opposite direction til the ends come off. Stash those for future use with loads of things you need a good, strong clip for. (That pile of bills? maybe, perhaps you have a big pile of cash you need to clip? Wouldn't that be nice?!)
 
Cut the batting, I used 2 pieces of 4" X 8"  that would fit the length of one side of the hanger. I also cut 2 pieces of fabric about 12" long, and about 3" wide.

I wrapped the batting around the hanger. It stuck pretty good on it's own, no need to sew, but if you like you can handstitch it to itself. Then I sewed the long fabric piece, back stitching only ONE end. So that I can pull the free end threads and shirr the fabric.
Pull the bobbin thread GENTLY on both sides of the fabric until it reaches the length of the hanger. Turn right side out and snuggle this fabric onto the batting covered hanger edge.
Then hand stitch the two edges of the fabric together. Last touch is to add a ribbon over the stitching and tie in a cute bow at the top. So now you have a cute hanger using a recycled item. Yay!
 
tip of the day:
I don't remember if I used this tip before...but if I did - it's worth repeating. Save the pickle juice you get in your nice big jar of dill pickles. You can make easy pickled asparagus or beans with this. Blanche the asparagus or string beans in boiling water for 2 min.  Then plunge into cold water to stop cooking. Take the veggies and put into the jar with pickle juice. Let it sit in this for about 2 weeks (or longer). I use these pickled veggies to garnish my tray of deviled eggs, or eat for an antipasto.
 
That's all for now!
:D


Monday, July 22, 2013

Glass Slippers

Want to get rid of those fabric scraps? Have those long pieces that you can't figure out what to do with?
Then this is your project...
WINE GLASS COASTER/COZIES/
These sweet little coasters fit on to the bottom of the wine glass. Not only do they catch the moisture, but you can use them as 'wine charms'. Since the linings are different colors, drinkers will be able to tell their glass from the other party goers. They make GREAT gifts! Add a nice  bottle of wine, and you have it made. See wine gift bags in my previous blog....
 
You will need:
1 piece of solid colored fabric for the base: 24" X 6"
1 piece of print fabric for the top: 24" X 6"
and 4 pieces of solid colors (different colors) 6" X 6" each for the lining
CD
scissors
sewing machine
sharpie markers

Use the CD to trace around the four solids, four prints and four asst. colors. You can stack them, pin in middle and trace and cut.


Put the print and the lining right sides together. Pin both sides and use your iron, fold in half to find the middle line.
 
Sew up one side of fold line, turn fabric and down the other side, about 1/4" apart. Then take your scissors and cut in half.
You will now take your iron and open up the halves, press open.
Then you will fold the solid underside under, leaving a bit showing (to differentiate from the other glasses). Now take these folded pieces and place side by side and stitch around the outer edge, about 1/4" from edge.
Now trim the excess fabric off about 1/4" from edge.
Then you will turn this inside-out, press open and voila, you have it!
Your party goers will be able to tell their own glass from the lining color peeking through the middle of the coaster. Plus the hostess will keep her table 'ring free".
Great way to use up scrap fabric. And what a wonderful gift. Make 12 or more if your recipient hosts lots of big parties. I made 20 for my neighbor's birthday for her big bashes. I used a different design for each one: zebra, parrot, stripes etc. Easier to remember your that way.
They are great, no worries about looking for coaster to set your glass on.
Then stash those wine charms. Who can remember which colored bead they had anyway!
 
Tip of the Day:
Grab one of those 6 pack cardboard wine holders from the grocery store, pick up a couple of nice bottles of wine. Then go to the dollar store, and get 4 wine glasses and a cellophane gift bag, slip on your wine coasters and wrap each glass in colorful tissue paper. Wrap up the wine bottles in tissue. Then put all 6 pieces in the holder, wrap up in a cellophane bag with a nice big bow, and you have an inexpensive (for you) yet unique and special gift for that lucky someone~!!!
 
That's all for now,
Dee


Friday, April 26, 2013

Cat and mouse

I have a new cat since November. My old buddy passed away and a new baby found her way to us.
Her name is Sedona, and she has been adjusting to us and we to her. She is not like my old gal, but sweet in her own rite.
I do craft fairs, and the few things I always sell are 'cat' items. So today's project is for the cat lovers and their cats or friends who have cats...
today's project is:
Cat Nip Mouse
You will need:
gray felt, fabric scraps (4" square), 6" ribbon, cat nip, fiberfill stuffing
 
 Cut two pieces of fabric (I use cotton, something thin so the kitty can smell the cat nip through it).
Place them wrong sides together.
Cut two ears from the felt, about 1 1/2" long. Place them inside with the ends sticking out just beyond the seam line.
Place the tail inside the mouse with just the tip sticking out of the end. Pin.

Now sew three sides encasing the ears and tail. Turn right side out. Fill with about 4 teaspoons of dried catnip. Then stuff the rest with fiberfill.
Hand stitch the remaining side shut.
Your cat will LOVE this, just like mine....

tip of the day:
When doing laundry, make sure you unfold any pieces and also unfold and unfurl before throwing into the dryer.  I washed some napkins without unfolding them, and they came out of the dryer with the same folds in them. Telling me that perhaps they didn't get washed all the way inside.
That's all for now...
Dee


Friday, April 19, 2013

wine bottle gift bag


I have some great sewing buddies who pass on fabric. And I love to figure out ways to recycle it. I got a particularly fun batch of fabric samples that used to be attached to a large sample book.     
                                                                       They have two grommets in the tops and all four sides were serged and finished.  I figured out that the height was a perfect size to fit a wine bottle in. But what about those grommets... so what I did was use them to put a ribbon through to close up the gift bag around the neck of the bottle.  And to minimize the amount of sewing, I turned the top down, stitched a casing into which I threaded the ribbon. If you look at the photo at the right, you will see that the top part is a little different than the bottom part. That's because it's the 'inside' pattern of the fabric.
The ribbon comes out of the grommets and they give a nice finished touch to the gift bag. I also made four wine glass coasters to match the bag. So now when I go to someone's house for dinner, I can bring a bottle of wine in a gift bag that can be recycled over and over. But the coasters can be kept by the first recipient as a hostess gift.  The coasters were made by zigzagging a circle of heavier fabric. Then trimming away the outside close to the zigzag edge.
 
If you don't have access to fabric samples, but have some fabric that would make a nice bag, you can still make some simple cloth wine bottle gift bags very quickly and easily.
Measure the fabric 18" X 13", and a length of ribbon about 24" long. (The ribbon in this picture was a little too short, it was 18" and I couldn't tie a bow with it when I finished. So I would rather have a longer piece) Fold the top down 3" toward the wrong side. Fold the ribbon in half and tuck it inside with the folded end extending out a little bit.
Sew up the bottom and up the long side, catching the ribbon into the seam. You don't even have to hem the top down. Because it will be hidden inside. Turn the bag right side out. Put your wine bottle in, take the ribbon ends, wrap around the bottle and tie. And tell your hostess that she could pass on the gift bag to THEIR next dinner party hostess.
tip of the day: I have an ivy plant which is getting a bit leggy. So I took a wire clothes hanger, curved it into a circle, straightened out the hook and stuck it in the middle of the pot. Then I wound the ivy around the circle to create a faux topiary.
That's all for now...
Dee

Friday, March 8, 2013

Lady bug pouch

I've been playing around with different ideas for my cell phone accessory pouch.
A couple of posts ago, I gave you directions to make a turtle.

And today it's going to be a ladybug.  Both shapes lend themselves well to the round pouch. And they are soooo cute, I can't stop...

Today's project is:
Lady Bug Pouch
You will need:
black felt
red fleece, or red cotton fabric
black ribbon
black cotton fabric
black zipper
fabric glue

First you will cut 2 black circles, and one red circle. I used an old DVD. It's the perfect size to use as a template. Cut one black circle in half, and the red circle in half.

 Iron a small 1/4" hem into the straight edge of the black fabric. This will be pinned, then stitched to the zipper. This is bottom of the bug.

Now if you have red fleece, there is no need to fold under the straight edge, but if you have plain cotton fabric, you should iron down the edge to the 'wrong' side of the fabric about 1/4 "

With the red fabric, open slightly at an angle to look like ladybug wings and lay on the black circle. Right sides are both facing up. Now you will pin down and stitch along the straight edge of the red fabric.  This is the top of the bug.

With the felt, you will cut out 6 small circles (about  1/2" wide) and one larger oval (about 2" long and  1" wide) for the head.  Cut about a 1 1/2" length of narrow ribbon also.

With right sides together, you will "sandwich" the head inside the two body parts, with the bulk of the oval INSIDE. Make sure it is at the top, where the red fabric comes to a point. At the opposite end, fold the ribbon in half, and lay it INSIDE with the two ends peeking out.

At the illustration here.......^
I used a red zipper and ladybug fabric for the bottom. The black on black was too hard to see.
Plus, I trimmed the oval head, yours should be peeking out a bit more.

IMPORTANT: un-zip the the zipper so it is halfway open, before you sew around the perimeter!  That way you can turn it right side out. Also, if you have a super long zipper, you can trim it now, with old scissors, if the teeth are metal. Never use your good fabric scissors to do this.

Stitch around the lady bug "sandwich", trim excess fabric outside of your stitch lines. Turn it right side out. Put a popsicle stick, or dull pencil, or chopstick inside the bug, and drag around the inside edge to ease the fabric out to it's fullest.

Now last touch is to glue the black felt circles onto the wings. If you want to wash this pouch in the future, you must use fabric glue that is washable. If you don't think you will be washing it, Tacky glue will work fine.  I added a split ring onto the ribbon 'tail', but that's optional.

Now it's ready for anything you want to put into it. I use it for my cell phone recharging plug. My daughter uses hers for her earbud earphones. My other daughter uses it for her small sewing notions. Like replacable needles (see tip below)
I think you'll find lots of uses for the cute little guy.

tip of the day:
My friend Sheila, gave me a great tip for you sewing ladies. Different size needles have TINY numbers on them, sometimes very hard to read, so she puts different colors of nail polish on the ends, for the different sizes. You can brush a small dot on the side of your sewing machine and use a Sharpie Marker to write the needle size next to it.  Or paint this on a piece of white cardboard and keep it with your needles. Happy sewing!

That's all for now...
:D


Friday, February 22, 2013

turtle pouch

I love to be organized.
I love to have all my papers, cords, cards, lists, coins, coupons, etc. in their own little places.

I have some great little organizers on my Etsy site: ArtToWearByDee.etsy.com

Check it out, there are small shopping bag/store card holders that are perfect for today.
So many places now are discouraging or charging for bags, so now you can have your own bags, in the same place as your store cards. Whip out the card, whip out the bag.

Also I have a bag for your purse that unfolds into a larger bag for those unexpected shopping purchases. I use mine all the time. It's really funny, how many places I go to and buy a little something, but don't want one more plastic sack.

And now I have these adorable little turtle pouches perfect for your smaller goodies. Cell phone earbuds, or recharging cords. Or even change, charge cards, etc. They are so cute, you will want one to have just to look at.

Today's project:
TURTLE POUCHES

You will need:
cotton fabric, scraps or recycled
zipper (can be taken from an old piece)
felt
2" ribbon

This will require some sewing knowledge. But once you get it down, you will be making these cute creatures by the dozen...

Get some fabric that is  at least a foot across
fold in half and cut a circle out that is approx. 6" across. I used a small bowl to measure.
You will take one of these circles and cut it in half. To these halves you will be sewing a zipper into them. Fold raw edge down and pin to zipper and then sew. If the zipper is longer, don't worry, we will cut off the excess later.


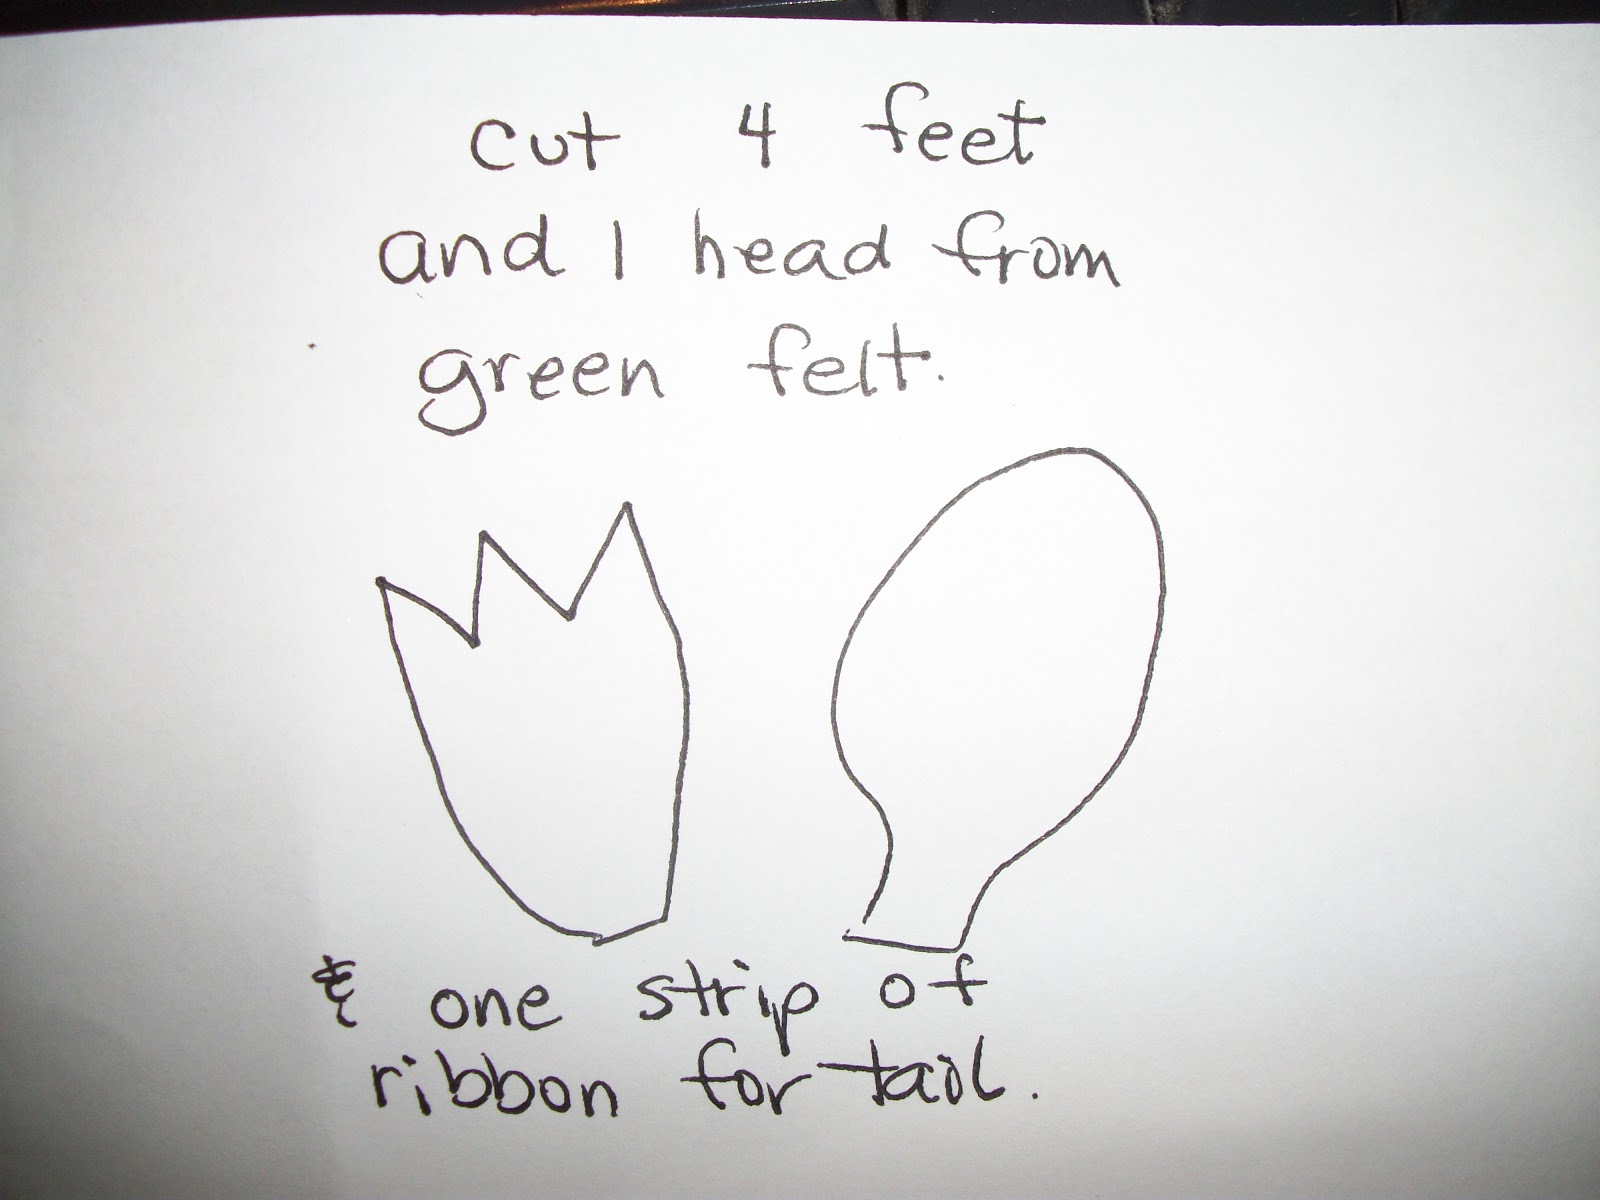
Now you are going to cut felt pieces to look like legs and a head.
Now you will assemble the two body parts. Take the head and feet and place inside, the two big circles are facing each other with right sides in.


 Don't forget the little ribbon piece that you will fold in half and place at the opposite end of the head. Folded end on the INSIDE of the circle.
You will be facing the feet inside, so when you turn this guy inside out, they will be sticking out. Also remember to open the zipper 1/2 way, or you will not be able to turn this turtle right side out. After you sew, cut off any ends of an extra too long zipper, using an old pair of scissors.
 Then trim the raw edges and turn right side out.
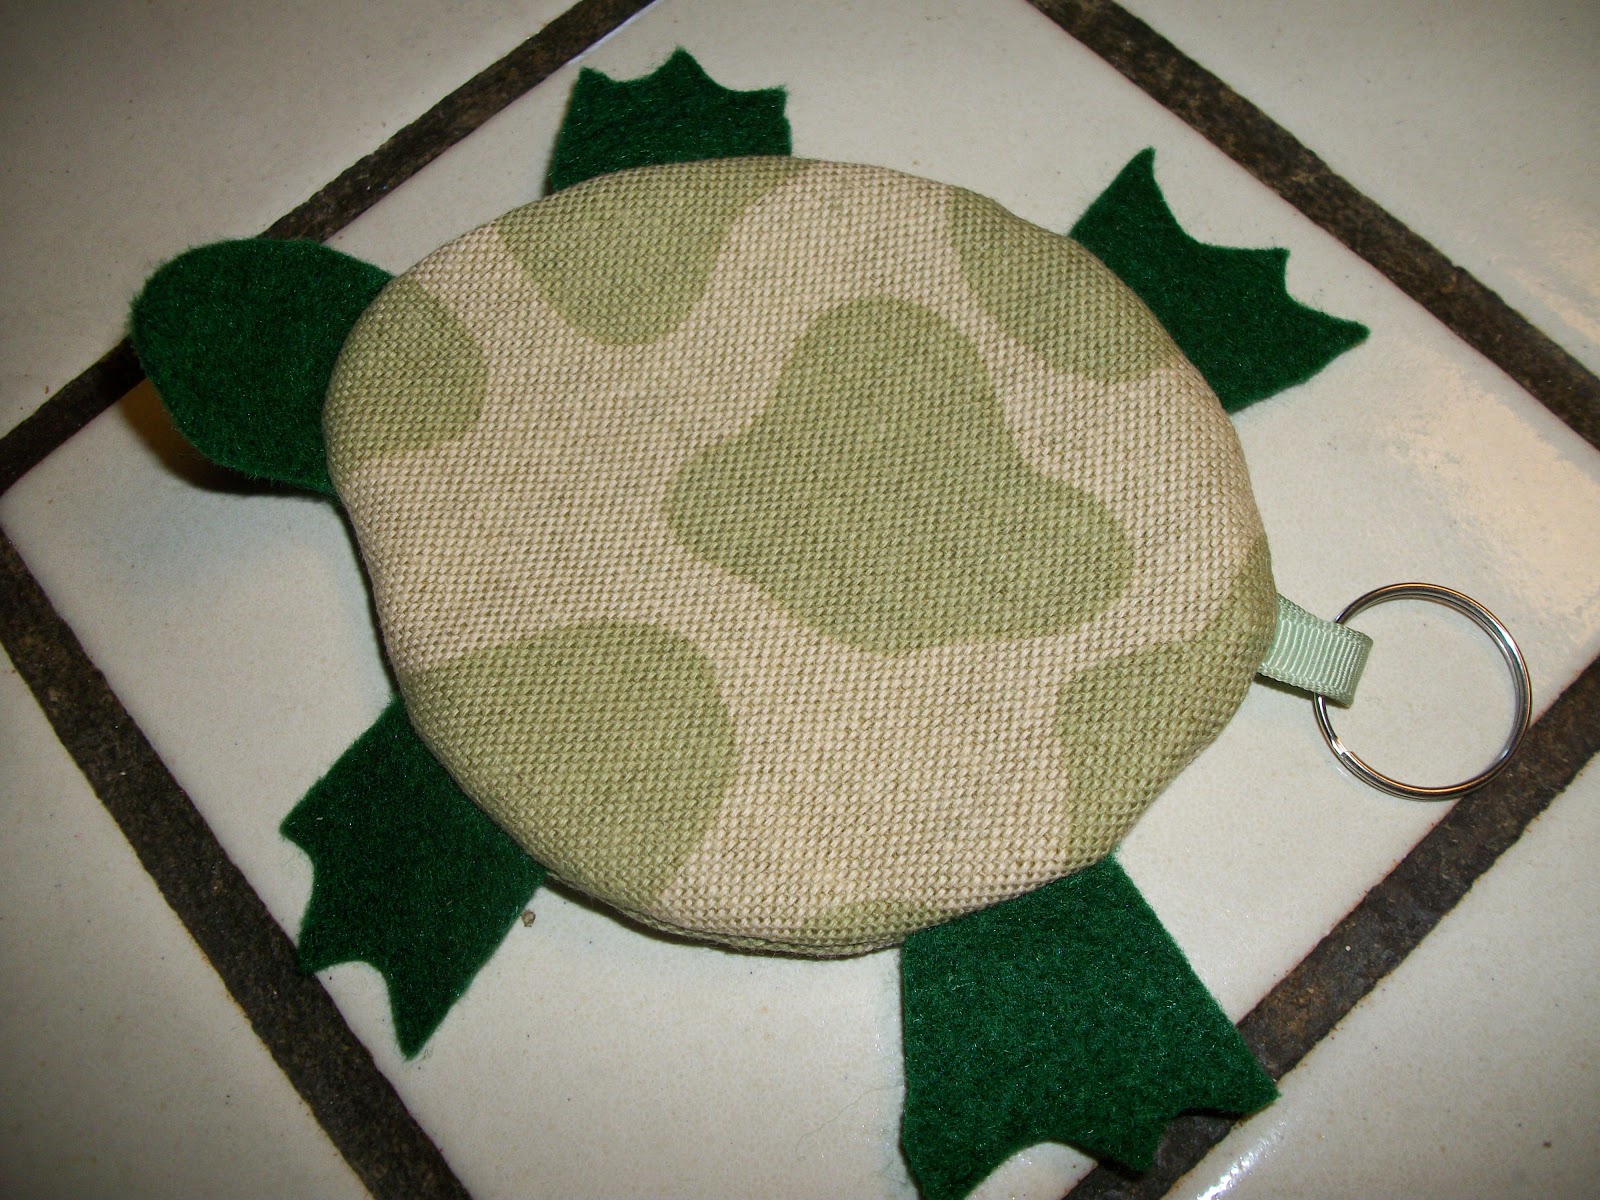
It should look like this:
I added a key ring to the 'tail' in case I wanted to add it to my purse, or key chain, or belt loop.

Tip of the day:
If your pencil's eraser gets all shiny and doesn't erase anymore, try to give it a bit of a filing with an emery board. This will shave off that shiny surface, and then you can erase that ONE little mistake you made (because you don't make a lot of them, right?  :)

That's all for this week...
:D

Friday, February 15, 2013

Infinity scarf

The weather has been pretty chilly lately, and I hate being cold around my neck, so I made a bunch of casual, cotton infinity scarves. Luckily my neighbor cleaned out his closet and I got some nice color variety. Scarves are a great way to add a little something extra to a plain outfit. And these simple loops go great with T-shirts and jeans.

Today's project is:

T-shirt Infinity Scarf

You will need:
a t-shirt, extra large is best
(You can find t-shirts at thrift shops, raid your neighbor's closet or buy them cheaply in a 3 pack at Walmart)
scissors

You will cut the bottom hem off the t-shirt. Then cut about 12"  - 14" up (approx.) This should be under the sleeves.

Then holding this round loop, put your foot down on the end, and pull and stretch the top upward. Be strong!
As you do this, the fabric will curl inward, so you don't need to hem this. The T-shirt fabric will not fray.

Now you have a naturally folded loop, double it up around your neck, and voila, instant fun accessory as well as keeping you cozy.

Use the rest of the shirt for rags. Cotton t-shirt fabric is nice and soft and absorbant.

tip of the day:
Buy some Altoid mints and save those great metal tins. They are good for so many things. Small sewing notions, travel jewelry case, store cards fit in them (how do we accumulate so many of those things?). If you need a small 'wallet', use one of these tins. Your credit card, coins and cash fit in nicely plus a couple of keys (without a big keychain). Stash in your pocket and off you go!

That's all for now...
:D

Friday, February 8, 2013

bottle gift bag

I was given a bag full of fabric samples, and each one had two grommets in them. So I put my brain to work, and came up with today's project of recycled fabric...
This can be used with wine bottles, olive oil, or flavored vinegars. It's a great hostess gift

Wine Bottle gift bag
you will need:
fabric, ribbon (about 18"), sewing machine or hand stitching

The sample was the perfect size for a wine bottle. But you could use these for olive oil or flavored vinegar, etc.  But the problem was that the grommets were too close to the top.  So I folded down the top and stitched the bottom edge. Also I stitched 1 inch above this to form a casing to put the ribbon through.

Then turn it inside out, and stitch along the side and bottom. Turn inside out and then take a ribbon, add a safety pin onto the end, and feed it through one of the grommets until you come to the second grommet and come out. Pull ribbon through until the ends meet.

When you go to a friend's for dinner, or for a special occasion, put a nice bottle of wine in here, tie ribbon tightly with a bow, and surprise your hosts with a wonderful, REUSABLE, bag. Or when you go to BYOB gathering, you can transport your wine in style. White, chilled wine will stay cooler longer and as it 'sweats' the bag will help with that.

(IF you don't have samples with grommets, you can use a piece of fabric, cut 15" x 13". Fold down the top, double and stitch a nice clean edge. Fold 'right sides in' and catch a ribbon, that has been folded in half, as you sew the side seam so when you turn it inside out, the ribbon will stick out and you can tie it up that way.)

today's tip is:
keeping a package of floss in your purse can come in very handy. Not only can you keep your teeth clean after meals out, but I have needed a string to tie something with in a pinch, and floss is strong and handy.

That's all for now...
Dee

Friday, March 30, 2012

Purse revamp: book it

I was visiting a cool gallery in Wisconsin last year, the FLYING PIG, and  found these "intellectual" purses. I "booked" a ride on this craft trip, and "read" up on sewing techniques. This project might "turn a page" on your recycling urges.

You'll need:
an old book, with a cloth cover (hunt them out in thrift shops, or even your own library)
glue gun
fabric
scissors
handles (bamboo or fabric or chain)
D rings or split rings (used for key rings)
needle and thread

Now this is my idea of how this might work...
This is the view from the front. As you can see the artist used an book with a cloth cover and then a added a bamboo handle attached to the book with metal rings.

I'm thinking they used wire or key rings to attach the handles to the bag. But we can use whatever we want, as far as handles.

If you pull out all the pages and left the cover you will get the base for this purse. You would have to use a glue gun and fabric to add to the inside of this purse.
Remember, if you mess up, it's only an old book. Use a less desirable one to practice on. Then graduate up to a vintage book with a cool title or color.

This is the end view of the purse. So all you creative peeps check it out and see how you can figure this out.  This is NOT for the novice, but perhaps for the creative, "let's give it a try" and see what I CAN do crafters.
I know the shape, when the purse is open is wider at the top, to allow you to get into the purse easier.

 I, myself, could not tell you how to do this, because I have not tried. But I'm dying to. So perhaps in a future blog, I may get this down to a science.

I totally adore the idea that you can take a cigar box, or book or whatever and make it into a purse/bag. Cuz I LOVE those.  I will be searching for fun stuff to make totes and fun stuff make bags in a way we didn't expect!!!!


tip of the day:
I picked up some great veggies at the grocery the other day. But I think I might have gotten tooooo many. So to keep them the freshest I can, I placed a couple of brand new sponges into the vegetable bin to absorb the excess moisture. Be sure to check these every couple of days, and wring them out. You'll be surprised to see how much moisture is absorbed by these that would have made your food soggy.

That's all for this week...
:D

Friday, October 21, 2011

Fabric pumpkins

I love making new things from old stuff.

The neighborhood is really getting into decorating for Halloween. The air is getting colder, we've had some rain, (and snow up in the Sierra Nevada mountains, near Lake Tahoe).
So I guess I have to resign myself to the fact Autumn is here.

So I will decorate my house too! Inside and out. Today's project is: Fabric Pumpkins
you will need:
~fabric (fall colors) I used an old cloth napkin, and a tablecloth.
You can use a new piece of fabric, or scraps from previous projects.
~glue gun
~stuffing (cotton balls, fiberfill, the one sock who lost its mate in the wash, etc.)
~green felt
~needle and thread
~green wire (optional)

You will need to make a circle template. I used a pot lid. Put it on your fabric (wrong side up) and trace around it. I used a pencil. The bigger the circle, the bigger the  pumpkin.  (ie. the bigger the lid, the bigger the pumpkin)

Cut this out. Thread the needle and tie the two loose ends of the threads together, so you have a double strand (stronger). If you don't have sewing supplies, you COULD use the glue gun, it's a bit trickier though. You would have to glue the edges as you try to scrunch them together. Watch out not to burn your fingers, ouch!
Sew a running stitch ( -  -  -  -  -  -  -  ) around the edge of the fabric circle. You will pull up the threads to gather the circle, but before you gather it up all the way, put your stuffing in.
Then knot the thread so the top is closed up tight.

Next take your green felt, cut out a couple of leaf shapes. No need to be perfect on the shape.
And cut a long rectangle also. You will roll up the rectangle, periodically gluing as you go, so you end up with a stem.
Now glue the stem to the top of the pumpkin with the hot glue. (You could sew it on too, if you had no glue gun).
And glue the leaves to the sides of the stem. The stem and leaves help hide the gathered top.

If you have green wire (can be florist's wire, or telephone wire), wrap this around a pencil to make it curly. Then wrap a few times around the base of the stem and twist to secure it.
You could use curling ribbon (used for gift wrapping), too. I like the look of the wire, though.

Make a bunch, for every nook and cranny. They look nice nestled among some Indian corn, or squash, in a basket, too.

tip of the day:
If you are buying the wonderful apples that are in season now, here's how to keep them fresh for a long time.  Do not wash them, wrap them individually in a paper napkin (you can pull the plys apart if the napkin has a couple of layers), and put them in a brown paper bag.
Keep this in the vegetable bin of your refrigerator. Take out the apples one at a time, as you need them. Wash them now and enjoy. You'll be surprised how long they last kept in the bag.

that's all for today!
Dee


Friday, August 26, 2011

Hey Pin head!

Well, we're back from Montana. And I must say as much as I enjoyed it, I'm very glad to be home. I can work on my blog, and make earrings and...
figure out new ways to make new things from old stuff!

I got back into my studio and started sewing some great purse size/open up to be big bags.  (see my website for an example: http://www.arttowearbydee.etsy.com/ And as I was picking out pins and needles from my pin cushion, it dawned on me that I had today's great project!
This pin cushion is 29 years old, so it may look a bit shabby. It has gotten a lot of use but is still going strong. When my girls were babies (being twins) I used a whole lot of baby wipes. And it was a shame to throw away the sturdy plastic containers. And so I used them for everything from storing their small toys, jewelry, puzzle pieces to...

wet ones/ pin cushion

You will need:
~an empty cyclindrical wet wipes container
~fabric
~piece of foam
~glue (glue gun, spray glue, or our good old 'strong glue' like E6000)
~optional trim: lace, ribbon

Take a piece of paper and fold around the container, this will be the pattern to go around it, leaving an extra inch for overlap.
Measure from the bottom to the where the lid fastens. Cut your paper pattern accordingly so this will be your height.
Put this paper pattern onto your fabric and cut leaving a 1/2 inch border all around. You will be folding this excess under so you have a nice finished edge.

Now take another paper and put under the lid and trace around it. This will be your pattern for the top. You will place this on your fabric and cut around it leaving a 2" border all around. Because this has to cover the top and hang over the edges also.

Use the same pattern to cut your piece of foam. You can get this from a packing box, that perhaps some electronic equipment came in, or from a fabric store. I always seem to have this stuff. Not sure where I snagged it, but I save everything.

Anyway... now you will iron the edges of the main fabric under, so it fits exactly around the container, but no frayed edges are showing. Adjust the ironed edge accordingly. You should have an inch extra to wrap around, so just iron a nice edge on one side. The frayed edge will be underneath.

You don't have to iron the edge of the top circle, if you are using a piece of lace to cover it. If not, iron it under about 1/4" and use your glue to fasten it down. If you can sew, sew the edge under. You can also sew the edges of the main container fabric also instead of gluing. And since you are using this for a pin cushion, I'm assuming you are someone who sews.

Take the glue and spread it around the container and press the fabric onto this. Remembering to start with the frayed edge and wrapping over it with the finished edge.  Use rubber bands or masking tape to hold it securely til dry.

Put glue on the lid and press down the foam. Put glue on the foam and edges of lid and press your fabric circle down on this. If you are using lace add some glue to the lace and press onto the edge of the lid. This should overlap and hang down over the edge of the fabric to cover the raw edge.

I store lots of sewing goodies inside the container, so it does double duty while taking up a small space on your table.

TIP OF THE DAY:
Summer time = swimming. And if you get swimmer's ear (water trapped in the ear canal) from swimming or even in the shower... here's a household solution. Take a cotton ball, and soak it with rubbing alcohol. Drip 4-5 drops into the ear and keep your head tilted so it can dry it out for a couple of minutes.
(If you look at the ingredients of a purchased bottle of Swim-Ear you'll see 95%Isopropyl alcohol (rubbing alcohol). This is a drying agent.
As always, keep out of eyes.

That's all for today!
Dee