Showing posts with label wine. Show all posts

Saturday, January 25, 2014

Wine Tasting

Well, this is very interesting for those wine drinkers out there....


We are having a wine tasting at our local club. And I thought it might be fun to have a "personal" tasting between Tom and I to see which wine we should bring.


I have 4 wines, prices ranging from 5.00 to 17.00. So this is totally 'do-able' for those on a budget.


I arranged 4 glasses with 'post-it-notes' on each glass. I had a master list which told me which wine was which. Which I promptly forgot! So that was good as far as my tasting was concerned. ha ha


I poured wine into each glass, and had crackers to eat in between. It was so interesting to see that he and I were on the polar opposite on the range of Chardonnays.  He chose one that I thought was bad, and visa versa.  But as it turned out, the one in the middle (with 3 stars) we agreed on. So that's the one I 
will be bringing.  It is Cupcake Vineyards, Livermore, California!!!


Ha! Who knew?


Why don't you have some people over, and have a blind tasting. Have everyone bring an appetizer and a bottle of wine wrapped in foil (so no one can tell what it is). Have prizes for best 'cheap' wine, best white and best red.


Sounds like fun to me...!
:D


Monday, July 22, 2013

Glass Slippers

Want to get rid of those fabric scraps? Have those long pieces that you can't figure out what to do with?
Then this is your project...
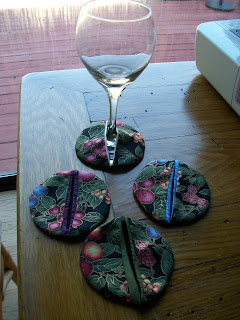
WINE GLASS COASTER/COZIES/
These sweet little coasters fit on to the bottom of the wine glass. Not only do they catch the moisture, but you can use them as 'wine charms'. Since the linings are different colors, drinkers will be able to tell their glass from the other party goers. They make GREAT gifts! Add a nice  bottle of wine, and you have it made. See wine gift bags in my previous blog....
 
You will need:
1 piece of solid colored fabric for the base: 24" X 6"
1 piece of print fabric for the top: 24" X 6"
and 4 pieces of solid colors (different colors) 6" X 6" each for the lining
CD
scissors
sewing machine
sharpie markers

Use the CD to trace around the four solids, four prints and four asst. colors. You can stack them, pin in middle and trace and cut.


Put the print and the lining right sides together. Pin both sides and use your iron, fold in half to find the middle line.
 
Sew up one side of fold line, turn fabric and down the other side, about 1/4" apart. Then take your scissors and cut in half.
You will now take your iron and open up the halves, press open.
Then you will fold the solid underside under, leaving a bit showing (to differentiate from the other glasses). Now take these folded pieces and place side by side and stitch around the outer edge, about 1/4" from edge.
Now trim the excess fabric off about 1/4" from edge.
Then you will turn this inside-out, press open and voila, you have it!
Your party goers will be able to tell their own glass from the lining color peeking through the middle of the coaster. Plus the hostess will keep her table 'ring free".
Great way to use up scrap fabric. And what a wonderful gift. Make 12 or more if your recipient hosts lots of big parties. I made 20 for my neighbor's birthday for her big bashes. I used a different design for each one: zebra, parrot, stripes etc. Easier to remember your that way.
They are great, no worries about looking for coaster to set your glass on.
Then stash those wine charms. Who can remember which colored bead they had anyway!
 
Tip of the Day:
Grab one of those 6 pack cardboard wine holders from the grocery store, pick up a couple of nice bottles of wine. Then go to the dollar store, and get 4 wine glasses and a cellophane gift bag, slip on your wine coasters and wrap each glass in colorful tissue paper. Wrap up the wine bottles in tissue. Then put all 6 pieces in the holder, wrap up in a cellophane bag with a nice big bow, and you have an inexpensive (for you) yet unique and special gift for that lucky someone~!!!
 
That's all for now,
Dee


Friday, April 19, 2013

wine bottle gift bag


I have some great sewing buddies who pass on fabric. And I love to figure out ways to recycle it. I got a particularly fun batch of fabric samples that used to be attached to a large sample book.     
                                                                       They have two grommets in the tops and all four sides were serged and finished.  I figured out that the height was a perfect size to fit a wine bottle in. But what about those grommets... so what I did was use them to put a ribbon through to close up the gift bag around the neck of the bottle.  And to minimize the amount of sewing, I turned the top down, stitched a casing into which I threaded the ribbon. If you look at the photo at the right, you will see that the top part is a little different than the bottom part. That's because it's the 'inside' pattern of the fabric.
The ribbon comes out of the grommets and they give a nice finished touch to the gift bag. I also made four wine glass coasters to match the bag. So now when I go to someone's house for dinner, I can bring a bottle of wine in a gift bag that can be recycled over and over. But the coasters can be kept by the first recipient as a hostess gift.  The coasters were made by zigzagging a circle of heavier fabric. Then trimming away the outside close to the zigzag edge.
 
If you don't have access to fabric samples, but have some fabric that would make a nice bag, you can still make some simple cloth wine bottle gift bags very quickly and easily.
Measure the fabric 18" X 13", and a length of ribbon about 24" long. (The ribbon in this picture was a little too short, it was 18" and I couldn't tie a bow with it when I finished. So I would rather have a longer piece) Fold the top down 3" toward the wrong side. Fold the ribbon in half and tuck it inside with the folded end extending out a little bit.
Sew up the bottom and up the long side, catching the ribbon into the seam. You don't even have to hem the top down. Because it will be hidden inside. Turn the bag right side out. Put your wine bottle in, take the ribbon ends, wrap around the bottle and tie. And tell your hostess that she could pass on the gift bag to THEIR next dinner party hostess.
tip of the day: I have an ivy plant which is getting a bit leggy. So I took a wire clothes hanger, curved it into a circle, straightened out the hook and stuck it in the middle of the pot. Then I wound the ivy around the circle to create a faux topiary.
That's all for now...
Dee

Friday, February 8, 2013

bottle gift bag

I was given a bag full of fabric samples, and each one had two grommets in them. So I put my brain to work, and came up with today's project of recycled fabric...
This can be used with wine bottles, olive oil, or flavored vinegars. It's a great hostess gift

Wine Bottle gift bag
you will need:
fabric, ribbon (about 18"), sewing machine or hand stitching

The sample was the perfect size for a wine bottle. But you could use these for olive oil or flavored vinegar, etc.  But the problem was that the grommets were too close to the top.  So I folded down the top and stitched the bottom edge. Also I stitched 1 inch above this to form a casing to put the ribbon through.

Then turn it inside out, and stitch along the side and bottom. Turn inside out and then take a ribbon, add a safety pin onto the end, and feed it through one of the grommets until you come to the second grommet and come out. Pull ribbon through until the ends meet.

When you go to a friend's for dinner, or for a special occasion, put a nice bottle of wine in here, tie ribbon tightly with a bow, and surprise your hosts with a wonderful, REUSABLE, bag. Or when you go to BYOB gathering, you can transport your wine in style. White, chilled wine will stay cooler longer and as it 'sweats' the bag will help with that.

(IF you don't have samples with grommets, you can use a piece of fabric, cut 15" x 13". Fold down the top, double and stitch a nice clean edge. Fold 'right sides in' and catch a ribbon, that has been folded in half, as you sew the side seam so when you turn it inside out, the ribbon will stick out and you can tie it up that way.)

today's tip is:
keeping a package of floss in your purse can come in very handy. Not only can you keep your teeth clean after meals out, but I have needed a string to tie something with in a pinch, and floss is strong and handy.

That's all for now...
Dee

Friday, February 17, 2012

Wine Bottle Vases

We had an awesome party to celebrate the twins' 30th birthday last month.
We had great food and wine. And with wine, of course, comes wine bottles.
So with this great collection of different shapes and shades of wine bottles left over, I made some great stone vases.  And, of course, we are recycling...
today's project is:

bottles using a flash
 Wine Bottle Vases

You will need:
~an empty wine bottle, with the labels removed
~Granite/Stone textured spray paint
~Painter's tape
~scissors

natural light through the bottles

To get the labels
off, you can put them
in an oven on low heat.
Most glues will come off with heat. Afterward, you might want to use GooGone to get any residue off.

I put my bottles in a pot of boiling water to loosen the glue. It worked pretty well. I put water inside of them, so they would not float.
Still had to use a straight edge razor blade to scrape off some pesky pieces.

Then you will need to 'mask' off a design with the painter's tape (which is blue and easily removed, unlike regular masking tape which can be toooooo sticky).

Take scissors and cut shapes (or use strips if you want stripes) and place on the clean bottle. Remember these masked shapes will show the bottle color through.

I found the lighter green bottles were a bit nicer, because they let the light show through better.

You can find the Stone spray paint at the hardware store. I used the brown color on three of them, and a white color on one.  The brown color looks more natural, more grainy------->

After you have the bottle taped off, take it outside and spray. This will take a few coats, with 20 min. in between drying time. To spray this stuff, you have to 'spritz' it on a little bit at a time, moving around the bottle.  One thing I found, especially with the darker color, is that if it goes on too thick, you can't see the blue tape under it, and that makes it difficult to peel off later. Because you can't see the tape. So don't put more than 3 coats on.

After it has dried, peel off the tape pieces carefully. The paint will chip off if you pick at it. So no unnecessary scratching.
I used silk flowers in them, but fresh baby's breath or big sunflowers would be stunning in these as well.

tip of the day:
Sometimes I use a recipe that calls for just a bit of lemon or lime zest. And then I have the rest of it leftover. Now, I cut it up into slices, and put them in an ice cube tray, fill up with water and freeze. So when I need an ice cube for water or ice tea or a special drink, I can have ice and a citrus slice all in one.  This is great for punches too. (you can find ice cube trays at resale shops, cheap. Handy to have for lots of stuff).

That's all for this week...
:D

Friday, September 23, 2011

Corky Candle

I love making new things from old stuff!

Hope you've been enjoying some fine wine during this autumn harvest season...
and saving those corks.
The vineyards around here have some really wonderful wineries.
It's always fun to go wine tasting and if you don't have any corks at home, ask the winery for some of theirs. They always have plenty.

Today's project is:
Cork Candle

You'll need:
~32 corks, approximately
~old candles
~bucket filled 1/2 way with sand
~one new candle (about 1" less than the height of two corks)
~plastic grapes, optional
~glue gun

You need to find a large can or vase that you can use a form to use while you glue the corks together. Make the bottom layer first. The glue the upper corks onto the bottom ones, and glue them side by side. Hold for a few seconds each time to let glue dry.

In the meantime, take your old candles and put in an old metal coffee can, and place this into a pot filled with water (double boiler) and heat up to melt the candles.

this part you should do outside...
After your cork circle is completed, make an impression in the sand bigger than this. Put the cork circle into it. Push the sand snugly (but gently) up to the outside of the cork circle. (This will keep the wax from oozing out.) Use a can to tamp down the center so it is even. This will be the base of your candle and you don't want it lumpy.

Place the candle into the middle and pour the melted wax around it up to the top of it.

Let cool overnight. Then lift gently out the cork candle and brush off the excess sand back into the bucket. You can hot glue a cluster of plastic grapes to one side if you wish. ( just make sure it doesn't interfere with the candle wick)

tip of the day:
If you have removed tape from something and it's left a sticky residue, a quick fix is to sprinkle baby powder on it, and rub it around then shake/wipe it off.
This works for pine sap too. Sometimes it gets on my clothes or shoes.
I bought some tea cups and saucers from the thrift shop, and they were taped together. When I removed the tape it left a sticky mess. But the powder worked wonders, so I could handle them easily.
Of course these will be for outside use (upcoming project). If you were to drink from them, use Goo Gone.
Of course, Goo Gone will take it off for good, it just takes more time.

That's all for now...
Dee

Friday, July 22, 2011

Carry on!

I love to make new things out of old stuff!

Remember when I told you how to loosen labels from bottles? Well, now is the time to use all those cool beer bottle labels, or wine labels.
Having friends over for a BBQ, you'll need to be bringing food and drinks in and out and this project is perfect for that!

PROJECT OF THE DAY:

label tray

You'll need:
~wooden tray. I got mine from TJMaxx, but you can get one at a thrift shops, or garage sale. It doesn't matter whether they look new, you'll be covering it up with labels.
~labels (beer, soda, wine)
~ModPodge
  (or you can make your own, 1/2 Elmer's glue, 1/2 water - mix well)

If your tray is in really bad shape, you may want to paint it. But just do the edges (inside and out). The bottom will be covered. Sand it if needed.

Lay out your labels and see how they fit together. You can overlap, or not. You can go up onto the sides, or not.

Using the ModPodge, brush some onto the tray, then lay one label down, and go over the top of the label with more ModPodge.

Continue in this manner until you have covered the tray to your liking.  Let dry, and then... have a party!

Tip of the Day:
Reuse all those envelopes you get in the mail.
When companies send you a solicitation, they usually send an addressed envelope for you to return. I find these come in handy for loads (not through the mail), or I donated them to my neighbor's daughter's preschool for the kids to bring their little projects home in.
I also cut off the corners to create bookmarks. Cut the bottom corners off at an angle (so you end up with a triangle). These slip over a single page I wish to save.  I use these not only for the books I'm reading,but for recipe holders in cookbooks, or on magazine pages I want to locate later. (You can write on them too, to let you know what you are saving.)

that's all for now

Dee