Showing posts with label handmade. Show all posts

Friday, January 25, 2013

Zip it!

I had a super great Christmas! Hope you did too. I got to spend the holidays with my girls and their guys, and we crafted, played games, watched non-stop Harry Potter, ate, drank and were very merry!

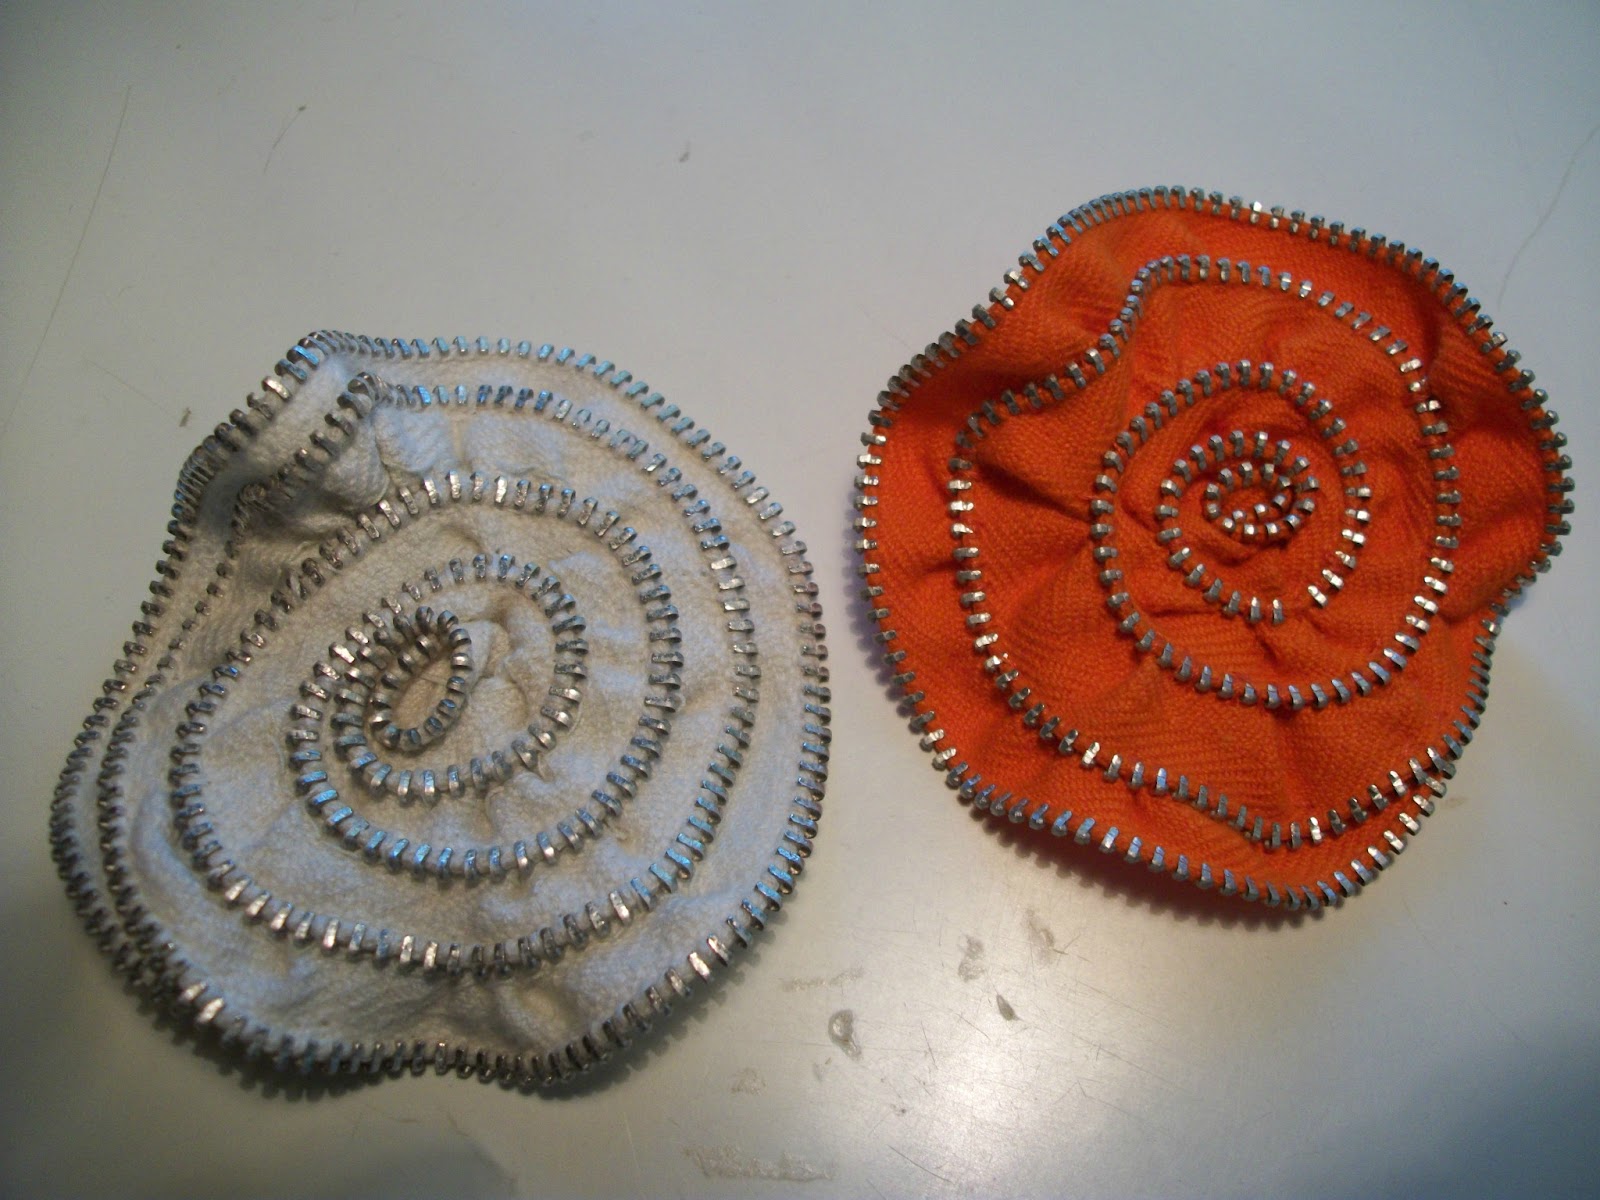
I received some fun new books for Christmas and one of the projects in there was this zipper flower. I have made a few, and added a pin to one, and a barrette to the other.
These are projects for the HAND sewing persons. So those of you who don't have a sewing machine can also make fun 'sewn' projects...
Today's project is:
ZIPPER FLOWERS

You will need a needle and thread and zipper (about 18") used/reused or new is fine. (I prefer the recycled) You can find zippers at thrift shops or off old clothes. Just cut it out!

white flower underside shows stitches
 
1. Unzip the zipper, so you only have one side. With the 'teeth' up, start winding and sewing from the bottom as you turn. the zipper will create it's own shape as you go. Keep stitching and gathering until you get to the end of the zipper.

If you want a pin, get a pin back and stitch it to the bottom. If you want a barrette you will have to get a barrette and stitch it to the bottom. If you want it on a purse or tote, just hot glue it down.

tip of the day:
I hope you have saved some of your Christmas cards this year. Cut one into a long rectangle, punch a hole and add a string/yarn/twine/jute and use as bookmark. Since you might have received some books for Christmas!
Also you can cut a few small squares out of the cards and punch a hole in the corner, add a string or ribbon and use for next year's gift tags.

That's all for now!
Dee

Tuesday, November 20, 2012

happy Thanksgiving

Well, it's that time again...
The year has zipped by, where were we?? So many things have happened this past year.
Life has brought us to the holidays, and are we ready? I am! (hee hee)
Sorry, not to gloat, but I've been stashing away gifts and looking forward to this time of year, for 11 months.

I love Christmas...everything about it (except snow and cold).
I love thinking about others, what they might like, I see things throughout the year, and buy goodies or better yet...make things (when I hear a hint about what my dear ones might like).
I love to looke forward to the look on their faces when they open a gift that is especially made for them.
And the funny thing is, I end up with more than I thought (sort of life's 'lay away').
But that's okay. Here it is Thanksgiving. So many activities surrounding the holidays, and so many crafts to try. Every magazine has tons of ideas, recipes and things to do.

Today's project is a simple one that focuses on the Thanksgiving table. A simple napkin holder. But creating an addition to the festivities is always fun. This picture is just plain cardboard. YOU have to find that special paper with special prints to accent your table.
LEAF NAPKIN HOLDER

Find double sided card stock, or use a gift box (you get from the dollar store) and glue decorative paper on the plain side.
Draw and cut out the  1/2 leaf shape onto each end of a long rectangle. Make sure you cut the two slits (on opposite sides) to connect the ends together. When you attach the ends, it will make a maple leaf. (right now, it looks like a spiky dachshund with two heads, ha ha)

This is a fun, quick and funtional craft that adds a handmade touch to the holiday dinner.
That way you are contributing to the day, even if you are not the chef!

IF you are traveling, be safe! Have fun and stop every once in a while, breathe and enjoy!!!!

tip of the day:
Soup is great this time of year. And most of the leftovers you have from dinner, can be combined into a great soup. V-8 is a great base for soup, add some chicken broth and throw in the veggies and turkey pieces.  Freeze it for future frosty days. (remember to leave 1/2" space in the container for freezing bloat.). We might not eat so much, knowing that our yummy leftovers will be enjoyed later.
HAPPY THANKSGIVING!
:D


Friday, June 29, 2012

Bluegrass wedding

Well, we had an AWESOME wedding last Saturday.
My daughter got married to her soul mate in the presence of family and friends
It was a HOT day, but besides that it, it couldn't have been nicer.
Smiles abounded, as well as many happy tears (mostly from me)  :)

I made 'redneck wine glasses' for wedding favors.
They were great because this was a casual wedding and fit right into the barefoot, bluegrass theme.
And no one picked up the wrong glass because I sprayed chalkboard paint on their bases (before assembling them). So as the guests arrived we chalked in everyone's names. And after the wedding they could take them home.
So fun and functional!

We made chicken and salmon on the grill, and all the guests brought a dish to share. So we had lots of yummy food.
The bride and groom even made their own beer and cucumber soda!

Today's project is:
glass and wire serving spoons

You will need-
-stainless steel utensils- spoons, forks or cake servers
   (the handles should be as flat as possible)
-glass pieces (you can find these at the Dollar Store)
  ...I use my own fused glass pieces, but the kind of glass bubbles that people
     use in aquariums work well also
-E6000 glue
-20 gauge wire (optional)

Using the E6000, adhere the glass pieces onto the utensil handle.
Let dry for 24 hours. Then if you wish take about a yard of wire, and starting from the back, wind this around and over and in between the glass pieces, ending in the back. Take some needle nose pliers and tuck the end under and around another part of the wire and put a blob of glue over this.

I have also made serving utensils using beads strung onto the wire and wrapped around the handles. This would be pretty also. Just make sure you secure the ends of the wire in the back firmly and tightly. And a glob of E600 is good insurance. If you want to buy some, see my website: arttowearbydee.etsy.com
Hand wash please, no dishwashers.

tip of the day:
If you are invited to a pot-luck wedding, buy a nice bowl or platter to bring your food in, then leave it for the newlyweds as a wedding gift. Include a nice serving spoon like the one in today's project.

That's all for now...
Dee

Friday, January 27, 2012

3 Dimensions

This post is a couple of days late, because I didn't want my girls to find out about their party...

Last week my twin daughters had their birthday.
We are planning a big bash for Saturday to celebrate. And, of course, I am happily going crazy making stuff for the party.

Their nicknames are "the Twinkies", given to them from my dad. And so I made some paper wrappers on the computer that say Happy Birthday to the Twinkies. And wrapped and taped them onto...what else...twinkies. Those are the party favors.

The left over paper strips (I cut off from the twinkie wrapper papers) became curly decorations to stick into their cake. Just take thin strips of paper, tape together at the bottom, and using the edge of the scissors, curl the ends. Attach to toothpicks or skewers with tape.

curled or not, these cute
decorations will go on the cake.
 And their cards have to be extra special, too. And this is what today's project is:
city scape

garden scene
3-D greeting cards
You will need:
~paper
~stickers or magazine pictures or recycled cards
~glue
~scissors

First you need to assemble all the parts you are going to use. The pictures or stickers or the fronts of recycled cards you have received (that's why you save all those cards you get).
Cut out the individual pictures.
Then get some card stock for the base of the card, and fold in half. The standard size is 1/2 of an 8 1/2" x 11" piece.

city scape pieces

Then get some scrap paper for the 3-D pop outs.
You need 2 pieces smaller than the base, fold in half and then fold up the bottom 1/2" and snip at the fold. These are the tabs that you are going to fasten to the base. I call these 'smaller cards'.
You will glue each one onto the base, by folding it up, put glue on tabs, place next to the fold in the base card - at an angle. Close the base. When you open it up, the 'smaller card' should open easily. 
I used two smaller cards, and 2 boxes
Adjust if need be.
Then make a couple of small 2 sided 'boxes'. These are rectangles, folded in half, with a tab at each end. Glue this onto the front of one of the 'smaller cards' and also onto the base.

Now you can start adding all the fun pieces to it. Glue them onto the 'smaller cards' and the 'boxes' and scattered around the base.

I added 'streets' before I glued
 down the pop up components.

You may have to glue this whole card down onto a larger piece of card stock if you find that your pop ups stick out beyond the base when it's closed.

You can keep adding little things until you have a look you like.

I made my own envelopes to fit these cards. I used scrapbook paper (12" x 12") and folded in all the sides leaving 1/4" space all around so the card slips in easily. I like to cut off the corners (squares). Glue 3 sides leaving top flap open.

Happy card making. Once you've perfected these simple pop-up shapes, there is no end to the fun cards you can make.

tip of the day:
When you plan a party, a theme is really the thing that ties everything together. The theme for this party is 30. Because that's how old my girls are now. All the guests were requested to make their gifts "30" themed. That is something that has 30 in., or 30 oz., or 30 pieces, or 30 on the package. It's a hoot to see what people come up with. It takes a bit more thought, but oh, so worth it, to see their creativity.

That's all for this week!
:D

Friday, September 2, 2011

Art in the Orchard

Not only do I love making new stuff from old things,but I love selling them even more!

The last weekend of August I spent a wonderful two days with my daughter Dana in the middle of an apple orchard.
We were selling our creations at the El Dorado County Artists sponsored: Art in the Orchard.
In the middle of this beautiful apple orchard, there were artists of all kinds. Fine art, crafts, handmade goodies galore. Along with live music, food, and fun events for kids, we had a great two days.

Dana made hats, bags, and wallets, as well as her fine art set up on apple crates  I had Betsy's (Dana's twin sister) prints and cards as well.
Besides these awesome creations, I had my own recycled aluminum can jewelry, and fused glass stuff. I also made some recycled beer bottle glasses, as well as recycled fabric bags and tins.

The weather was hot, the company was exceptional and the scenery was beautiful. All who came had a fun time, and we enjoyed each and every person who stopped by to chat, shop and enjoy our wares.

For a sneak peek at the kids' stuff check out their websites:
dana@danabetsy.com  and betsy@danabetsy.com  and of course mine: http://www.arttowearbydee.etsy.com/

Tip of the day:
I use a carabiner (that I took off my metal water bottle)  to secure my keys onto the outside of my purse. I got tired of hunting for my car keys at the bottom of the abyss, so now I attach them to the outside of my purse, and can lock the car, and unlock it, while the keys are dangling on the outside of my bag. And I find them in a snap.
It's so much faster and easier, and I'm much happier. :)

That's all for now!
Dee

Friday, August 19, 2011

Play your Cards right!

I love making new things from old stuff!

Greeting cards are one of my very favorite things to recycle. There are such beautiful designs, funny or cute or quirky, it's a shame to throw them away after the big day.

So start saving those Christmas cards and greeting cards that you receive. I will have loads of things to do with them.

This little gift box is perfect for gift cards, jewelry, cash, etc. Add a ribbon around it, some tissue paper inside, and you've got an already decorated box.

Today's project is:
Pillow gift box

you need:
~ a used greeting card (the larger, the better)
~ scissors
~ exacto knife
~double stick tape or Elmer's glue or Tacky glue

Step one is to make flaps on the 'open' edge of the card.
Keep it folded, crease a fold about 1/2" wide through both sides. Crease the fold with a popsicle stick, edge of scissors or your fingernail. Then open up the card and fold both flaps outward.

Next, you will cut the top and bottom of the card in an arc. Cut right off the edges, through the folded flaps.

Then open the card, design side facing up. You'll take the exacto knife, and gently score under the cut edges mirroring the arc. (not on the flaps)
See dotted lines in the picture below.
(These score lines aid in folding the top and bottom of the gift box closed.)

Now take the double sided tape and put on one of the flaps. Fold the flaps inward and close the card. Press up and down to seal securely.
OR glue one flap and close the box, and hold til dry. (You can use clothes pins or paper clips to keep it tightly together as it dries.)

Now you gently ease the curved tops and bottoms down to close the box. (See picture at the top of this blog) It puffs up a bit, therefore the name "pillow box".

It may seem a bit complicated at first, but if you do a bunch, you'll be cranking these out in no time. I always have some handy for special occasions (and to put my recycled aluminum can earrings in).
And remember, if you mess up, throw it away. It's not brain surgery, no one will die if you don't do it the right way. That's the beauty of recycling, you are giving something a second chance where most people wouldn't. So no guilt.
Keep trying and with every attempt you'll get better and better.

tip of the day:
I don't know about you, but I get WAY too many catalogs in the mail. Instead of throwing them away, here are a couple of ideas.
1. use them for a 'gluing station'. If you use a glue stick for your projects, go ahead and smear off the paper onto an open catalog page. If you have more to do, just turn the page and you'll have a fresh surface to get sticky.
2. If you have kids in the house, give them a 'treasure hunt' through the catalog.
ie. Give them a list to find, such as a 'blue' thing, a 'round' thing, a 'dog', etc. They can rip out the page when they find it until they collect all the treasures that you have selected. Then they get a treat.

I have loads more, but that's all for now.
Dee
Friday, July 15, 2011

Hot Stuff!

I love making new things from old stuff!

It's sizzling summer right now. Lots of BBQ-ing and getting together with friends.
Today's project is good anytime you have a hot dish and need a trivet.
Wood is a good insulator, and can withstand your hottest plate or bowl.

Today's project:

TWIG TRIVET

You need:
~glue gun
~string, twine or something similar to tie twigs together
~twigs (at least 1/2" thick) I used 9, but you can use more.
~ felt or leather or non-fraying fabric

First you need to gather some twigs. Try to find ones that are the same thickness.
Mine are 8" long and 1/2" thick.
I used pruners to cut them to approx. the same lengths (but no need to be exact).
Wash them and let dry.

You are going to tie one twig to the next one, to the next one, etc.

Cut two lengths of string, about 1 yard long (36")
Lay out the string so you can find the middle, and making a double knot, tie onto the first twig toward one side. Do the same with the other string toward the opposite side of the twig. (see pictures)
Now take the next twig and knot it to the first twig, on both ends.
Continue in this way until you have achieved the size of the trivet you want.

After you tie the last twig, trim the ends of the string to about 2" long.
Now measure the trivet and cut a piece of felt about 1/2" smaller.
Using your glue gun, adhere the felt to the bottom of the twigs, and make sure the loose ends of the string are tucked under.

TIP OF THE DAY:
Summer is full of picnics and I got a great tip from my sister-in-law Lauri on how to keep your sandwiches from getting soggy on your next picnic, or outing.
If you make peanut butter and jelly, spread the P.B. on one side of both pieces of bread, and then put the jelly in the middle. The P.B. will make a barrier so your jelly doesn't soak into the bread.
If you're making sandwiches with cheese, put these slices next to the bread (both slices). The cheese will protect the bread from soaking in the butter or mayo or mustard. Put these in between, with your lunchmeat, lettuce, etc. in the middle.

That's all for today!
Dee

Saturday, July 9, 2011

Wrap it up!

 I love making new things out of old stuff!

Back home from the Midwest now. I think I need a vacation from my vacation!
Always nice to see everyone, but traveling can be so tiring. I think I'll get busy on some cool recycling projects and get crafting. Always the cure for anything that ails you!

Project of the day:
Handmade wrapping paper

This paper will resemble the handcrafted look of handmade paper, but is so easy.

you need:
~plain white paper, the larger sized the better (this can be butcher paper you can buy in rolls, or paper that was used to wrap something in. That's where I found mine. Nice large sheets I just couldn't throw away)
~spray bottle (can be recycled hair spray bottle, Windex bottle, etc.)
~food coloring
~iron

This is a great project to do with kids. First take a sheet of the paper and crunch it up into a ball. Obviously if you are going to use it for wrapping paper, the larger it is, the better. But you could certainly use smaller pieces (for small packages, or gift cards)
Try not to rip the edges. Crumple gently with this first step.

Then open it up, and smooth it out with your hands. Then crumple it up again, this time it should be a little easier to crunch. Again, smooth it out as flat as you can.

One more time, crumple the paper into the tightest little ball as you can make it. Squeeze hard. Unfold gently, but you don't have to worry about smoothing it flat. You want some mountains and valleys.

Take your spray bottle, fill with about 1 cup of water, and several drops of food coloring. Put your wrapping paper out in the lawn, or on a plastic garbage bag, you do NOT want to let the food coloring get on anything. *It will stain!

Now spray the paper, it will puddle in spots, but that's okay. The more you spray, the more your paper will absorb the color. At this point, the paper fibers have been broken down a bit (by all that crumpling) and it will be softer and more absorbant than new paper.  If there are any wet puddles left, tip paper up and let run off.
Now let it dry. Out in the sunshine is best. Again, this is a good, outdoor summer project. (You can weigh down the corners with rocks or something, so the wind doesn't blow your cool project away.)

When the paper is dry, get out the iron and ironing board. You will iron the paper the best you can. Not all the wrinkles will come out, and that's where you get that 'handmade' look.  Now you're ready for gift wrapping (hopefully it's a project you made yourself from recycled stuff, ha ha). I like to use raffia instead of  ribbon, just because it looks more natural. But any embellishments will work. I stamped designs on my paper also, and then hot-glued acorns on for that woodsy look.

Tip of the day:
I know I've been giving you projects for summer days, but spray bottles and food coloring made me think of a fun thing we did this winter.
My neighbor's 5 year old daughter, Gianna came over with her mom to make a snowman in my front yard. Well, it kind of looked like a snow lady in a dress, so I put some purple food coloring in an empty hair spray bottle, and they sprayed the snow lady's dress and hat. She had so much fun with that. I had to scrounge up a couple of more bottles, with more colors, so she could go out and spray 'rainbows' on my snow.
This idea originated many years ago, when my daughters and I made a snowman, but it actually looked more like a fat cat. We sprayed orange food coloring it and turned it into Garfield, the cat. So if you live somewhere it snows, start saving up those spray bottles for some colorful fun.

That's all for today!

Dee