Monday, April 4, 2016

Cell Phone Holder

Keep misplacing your phone at home?
It needs a nest to rest in. And also can allow you to be 'hands free'.


Here are the instructions to make your own Cell Phone Buddha (as my daughter calls it)

1. You need a piece of fabric ( I used cotton) 15" X 12". Or two pieces measuring: 15" X 6"

2. Sew wrong sides together to form a tube (with one open end).

3. Turn right side out and grab a handful of stuffing, cotton or even a plastic grocery bag. Stuff into the tube making sure to get in the corners.
Then pour in about a cup of dried beans, rice or peas.


4. This is the trickiest part. Although it's not THAT tricky.
If you used two pieces of fabric, you will have two seams. Line these up and pin close to the bean stuffing.  If you used one piece and folded it up, you will have only one seam. So now you have to manipulate the fabric until this one seam is in the middle of the tube.
5. So now you have to pin across the fabric, containing the beans in while you stitch across.
 
6. Now you will roll up the 'open' end, first folding corners in, and then roll up tightly until you get to the stitching line. Pin both ends to hold, while you hand stitch the roll edges together.
 
7. This will create a little 'lip' for your phone to rest in. And now you are done!


Saturday, February 1, 2014

Mug Rug

Brrrr, for those of you back in the Midwest and East.  This winter has hit you hard. As for us in California, we are enjoying warm weather, but desperately need some rain (and snow). It has been a crazy winter season, for sure.
While I was down visiting my daughter, she had cleaned out her fabric/goodie stash and gave me a couple of old wool sweaters. So I used these to make today's project.


And in the spirit of 'keeping warm' ...


Felted Mug Rug
You will need:
an old sweater that is 100% wool, elastic cord and a button.


First you will need to wash the sweater in hot water 2-3 times. Use a little bit of detergent. A large sweater will miraculously change into a little baby sweater. But you never could use it to wear, it is too thick and stiff. Your kid would look like a paper doll with his arms sticking straight out.


At this point, the wool has felted and can be cut without the edges fraying.
I cut a piece approx. 9" X 3" .  I sewed a loop of elastic at one end, and a button at the other end on one side. My sweater had an argyle design, so I went over the colors with my sewing machine to give it some interest. But this is optional. Also I used a button that was all plastic, no metal. This way I can heat up my drink in the microwave with the Cup Cozy still on it.


And there you have it. You can get several from one sweater. Make a few, add some mugs, coffee or tea, and you have a great gift.


I also cut off the sleeve ends after one time in the washer. Now these snugglies can be used for 'take out' cups. Cut a long one for those Grande sizes, and a smaller one for the tall size.


So even if you are not staying warm this winter, your drinks will be!


tip of the day:
One of the 'hot' items these days are Reusable Lint Balls. These are made from 100% wool yarn, (non-washable). You make a ball of yarn about the size of a tennis ball. Put in a sock, knot the sock tightly and wash it 2-3 times in HOT water until the ball comes out the size of a golf ball. Or I bet you could boil it too. Then you throw 5 or 6 of these felted yarn balls in the dryer instead of a dryer sheet. I haven't tried this one yet, but let me know if you have and how it works.


That's all for now,
:D

Saturday, January 25, 2014

Wine Tasting

Well, this is very interesting for those wine drinkers out there....


We are having a wine tasting at our local club. And I thought it might be fun to have a "personal" tasting between Tom and I to see which wine we should bring.


I have 4 wines, prices ranging from 5.00 to 17.00. So this is totally 'do-able' for those on a budget.


I arranged 4 glasses with 'post-it-notes' on each glass. I had a master list which told me which wine was which. Which I promptly forgot! So that was good as far as my tasting was concerned. ha ha


I poured wine into each glass, and had crackers to eat in between. It was so interesting to see that he and I were on the polar opposite on the range of Chardonnays.  He chose one that I thought was bad, and visa versa.  But as it turned out, the one in the middle (with 3 stars) we agreed on. So that's the one I 
will be bringing.  It is Cupcake Vineyards, Livermore, California!!!


Ha! Who knew?


Why don't you have some people over, and have a blind tasting. Have everyone bring an appetizer and a bottle of wine wrapped in foil (so no one can tell what it is). Have prizes for best 'cheap' wine, best white and best red.


Sounds like fun to me...!
:D


Tuesday, January 21, 2014

Box of Sweet Traits


Well, first I have to apologize for not posting for so long. I don't think I have that many followers, so I never feel too bad about that.  Until someone asks me "What's going on with your blog"? (Thank you Sheila) and that reminds me that, yes, there are a few out there that take the time to read my stuff.


So gratefully and humbly here I am.  First I hope you all had a wonderful holiday. I know I did. My girls and their hubbies (and my 4 "Grand-Dogs") were all here for Christmas. Being together is what made it sooo special. We had such a wonderful time!!!  I will post some pix later this month of the fun stuff we did. But now I want to share this year's Birthday Card.


My sweet "twinkies" turned 32 and every year I try to make them a special birthday card. This year I came up with the idea of a box of paper chocolates that were filled with the girl's wonderful character traits.


So this project is:


Birthday Box of Sweets

you need:
decorative papers, glue, small box and sweet treats (optional)


I used a cigar box for one 'candy box'. On the outside I printed a birthday message onto scrapbook paper from my computer. On the inside of the lid of the box I printed this:
"Life is like a box of chocolates, you never know what you will get"... And we are so happy we got you, because you are:


And then I made a paper divider for the bottom of the box, and started making lots of little boxes from scrapbook paper or old cards, etc. These have to fit into the little spaces. If you would like to know how to make the little boxes please go back into my blog archive 12-30-11 to see how to do it.


Then I printed sweet traits (ex. talented, pretty, patient, etc.)  onto long strips. These I glued these into the boxes. Then I found some small chocolate treats and put them into the boxes also.


I told the girls that they could eat one treat a day, and exemplify that trait throughout the day. That way the card/gift keeps on giving. They loved it, and I loved making it!  Remember, a special gift doesn't have to cost a lot, be resourceful, recycle and put your time and love into it.

tip of the day:
After the holidays, it can be a lonesome time. Take a minute, drop someone a note, call a friend to come over for a board game, throw a pot-luck party for some silly reason! Did you not hear from someone in December, call or email to see how they are doing.


That's all for now,
:Dee


Friday, August 30, 2013

Recycled Store Hanger

You know those hangers you get when you buy pants or lingerie?  (undies to the rest of us)
They have two clips at the end, short hanger, plastic, presumably useless after you take off the underpants and toss the hanger in the garbage or you tell the cashier to keep 'em!

STOP!  This lowly little hanger can do so much more. #1...If you take pliers and pry off the two ends where the clips are...you have two strong clips that can be used for chips, bags, etc. Smoosh, break, file or whatever it takes to give you a smooth edge.

#2~Then...the little wimpy hanger that is left can be turned into an infant clothes hanger! Brilliant!!!

Today's project:
recycled hanger
What you need is:
store hanger
pliers
batting
fabric
ribbon
 First go out and get some new undies. You know you need them. Splurge! or buy some new pants, winter is on its way. (OR just go into the store and ask for those hangers.)
 
Keep ALL the hangers they come on. Take pliers and bend, bend, re-bend in the opposite direction til the ends come off. Stash those for future use with loads of things you need a good, strong clip for. (That pile of bills? maybe, perhaps you have a big pile of cash you need to clip? Wouldn't that be nice?!)
 
Cut the batting, I used 2 pieces of 4" X 8"  that would fit the length of one side of the hanger. I also cut 2 pieces of fabric about 12" long, and about 3" wide.

I wrapped the batting around the hanger. It stuck pretty good on it's own, no need to sew, but if you like you can handstitch it to itself. Then I sewed the long fabric piece, back stitching only ONE end. So that I can pull the free end threads and shirr the fabric.
Pull the bobbin thread GENTLY on both sides of the fabric until it reaches the length of the hanger. Turn right side out and snuggle this fabric onto the batting covered hanger edge.
Then hand stitch the two edges of the fabric together. Last touch is to add a ribbon over the stitching and tie in a cute bow at the top. So now you have a cute hanger using a recycled item. Yay!
 
tip of the day:
I don't remember if I used this tip before...but if I did - it's worth repeating. Save the pickle juice you get in your nice big jar of dill pickles. You can make easy pickled asparagus or beans with this. Blanche the asparagus or string beans in boiling water for 2 min.  Then plunge into cold water to stop cooking. Take the veggies and put into the jar with pickle juice. Let it sit in this for about 2 weeks (or longer). I use these pickled veggies to garnish my tray of deviled eggs, or eat for an antipasto.
 
That's all for now!
:D


Friday, August 23, 2013

Words, words, words

   What a crazy time of year. School is back in session, which means, yes...Christmas is right around the corner. I know, you are thinking, is Dee crazy??? But you just wait, you'll see. Time will fly by and soon we will be talking about Christmas gift giving.
     With me, it's when craft fair season really starts revving up. Why? Well, because people are starting to think about...yes, Christmas! And that's a good thing for me, because I like making gifts for people.
   This project was squeezed in between filling up my stock for the fairs. I was visiting my daughter, Dana. And she has a kitchen table which was in pretty rough shape on it's top. So on the spur of the moment I got inspired to decoupage it. I had a bunch of old dictionary pages with me that I thought she could use in her paintings, and they were perfect to use on the table.

Today's project is:

decoupaged table top
You will need:
papers to decoupage, (these can be anything from magazine clippings, to newspapers, to gift wrap)
Spray Mount (spray adhesive)
Mod Podge decoupage glue
sponge brush

First clean the surface you will be decoupaging on. This can be anything: chairs, tables, trunks. I have even used glass plates (see previous post for that one)

Then arrange the pieces you want to use. In my case, I laid out the dictionary pages and decided which way they would go. Some of the more yellowed ones were scattered around to give it depth and interest. And I tried to make the ones on the edges (where people would be sitting) easy to read. Something fun to do while eating, learn a new word!!!

Then I took the pieces outside, and over some old newspapers, I sprayed the adhesive on the back of the page. This is messy, because the spray will get on everything, so spray down close to the newspaper. You can skip the spraying part, and spread Mod Podge on the table and smooth the paper down on that also.  But I did not have enough Mod Podge to cover the table twice.

Then lay the pieces down, smooth out any air bubbles. If you have a brayer this work well, a dowel, or a rolling pin might work too.  After these have dried, take a sponge brush and apply the Mod Podge to an area, covering completely.

This may wrinkle or bubble up a bit as it dries, but don't panic. It will flatten out again when the decoupage glue has dried.
* One word of warning: Do NOT put anything hot on this surface you it has dried. I accidently put my tea cup down on it, and it started to bubble up.  IF that happens, take some steel wool, smooth down, and apply more Mod Podge. 

If you want to make it more durable, cover the top with a varnish or an acrylic sealer.

If you have some old chairs, like the ones I found at a garage sale, that were in bad shape as far as the paint was chipping off. You can see in the picture at the top, Dana and I sanded them and then she painted them with fun stripes on one and polka dots on the other, and put new fabric on the seats. And voila, you can make some fun chairs to go with your fun new table!  Paint words on the chairs to match the dictionary pages, if you use dictionary pages.

tip of the day:
My friend came up with some great uses for coffee filters. She uses them to hold small snacks like popcorn or goldfish.  You can fold up a couple, stash in your purse for the next time you take a little one to the movies. You buy a popcorn for yourself and pour some out for their own little bowl. Then you just toss them when finished.
 And she also puts them over bowls when microwaving to prevent splattering. Clever girl.

That's it for now...
:D


Monday, July 22, 2013

Glass Slippers

Want to get rid of those fabric scraps? Have those long pieces that you can't figure out what to do with?
Then this is your project...
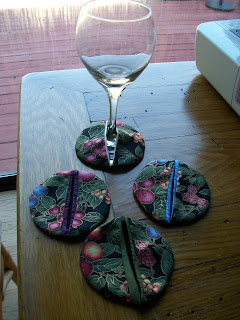
WINE GLASS COASTER/COZIES/
These sweet little coasters fit on to the bottom of the wine glass. Not only do they catch the moisture, but you can use them as 'wine charms'. Since the linings are different colors, drinkers will be able to tell their glass from the other party goers. They make GREAT gifts! Add a nice  bottle of wine, and you have it made. See wine gift bags in my previous blog....
 
You will need:
1 piece of solid colored fabric for the base: 24" X 6"
1 piece of print fabric for the top: 24" X 6"
and 4 pieces of solid colors (different colors) 6" X 6" each for the lining
CD
scissors
sewing machine
sharpie markers

Use the CD to trace around the four solids, four prints and four asst. colors. You can stack them, pin in middle and trace and cut.


Put the print and the lining right sides together. Pin both sides and use your iron, fold in half to find the middle line.
 
Sew up one side of fold line, turn fabric and down the other side, about 1/4" apart. Then take your scissors and cut in half.
You will now take your iron and open up the halves, press open.
Then you will fold the solid underside under, leaving a bit showing (to differentiate from the other glasses). Now take these folded pieces and place side by side and stitch around the outer edge, about 1/4" from edge.
Now trim the excess fabric off about 1/4" from edge.
Then you will turn this inside-out, press open and voila, you have it!
Your party goers will be able to tell their own glass from the lining color peeking through the middle of the coaster. Plus the hostess will keep her table 'ring free".
Great way to use up scrap fabric. And what a wonderful gift. Make 12 or more if your recipient hosts lots of big parties. I made 20 for my neighbor's birthday for her big bashes. I used a different design for each one: zebra, parrot, stripes etc. Easier to remember your that way.
They are great, no worries about looking for coaster to set your glass on.
Then stash those wine charms. Who can remember which colored bead they had anyway!
 
Tip of the Day:
Grab one of those 6 pack cardboard wine holders from the grocery store, pick up a couple of nice bottles of wine. Then go to the dollar store, and get 4 wine glasses and a cellophane gift bag, slip on your wine coasters and wrap each glass in colorful tissue paper. Wrap up the wine bottles in tissue. Then put all 6 pieces in the holder, wrap up in a cellophane bag with a nice big bow, and you have an inexpensive (for you) yet unique and special gift for that lucky someone~!!!
 
That's all for now,
Dee