Friday, February 22, 2013

turtle pouch

I love to be organized.
I love to have all my papers, cords, cards, lists, coins, coupons, etc. in their own little places.

I have some great little organizers on my Etsy site: ArtToWearByDee.etsy.com

Check it out, there are small shopping bag/store card holders that are perfect for today.
So many places now are discouraging or charging for bags, so now you can have your own bags, in the same place as your store cards. Whip out the card, whip out the bag.

Also I have a bag for your purse that unfolds into a larger bag for those unexpected shopping purchases. I use mine all the time. It's really funny, how many places I go to and buy a little something, but don't want one more plastic sack.

And now I have these adorable little turtle pouches perfect for your smaller goodies. Cell phone earbuds, or recharging cords. Or even change, charge cards, etc. They are so cute, you will want one to have just to look at.

Today's project:
TURTLE POUCHES

You will need:
cotton fabric, scraps or recycled
zipper (can be taken from an old piece)
felt
2" ribbon

This will require some sewing knowledge. But once you get it down, you will be making these cute creatures by the dozen...

Get some fabric that is  at least a foot across
fold in half and cut a circle out that is approx. 6" across. I used a small bowl to measure.
You will take one of these circles and cut it in half. To these halves you will be sewing a zipper into them. Fold raw edge down and pin to zipper and then sew. If the zipper is longer, don't worry, we will cut off the excess later.
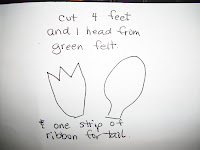

Now you are going to cut felt pieces to look like legs and a head.
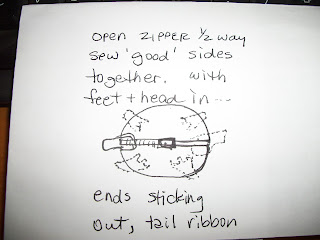
Now you will assemble the two body parts. Take the head and feet and place inside, the two big circles are facing each other with right sides in.


 Don't forget the little ribbon piece that you will fold in half and place at the opposite end of the head. Folded end on the INSIDE of the circle.
You will be facing the feet inside, so when you turn this guy inside out, they will be sticking out. Also remember to open the zipper 1/2 way, or you will not be able to turn this turtle right side out. After you sew, cut off any ends of an extra too long zipper, using an old pair of scissors.
 Then trim the raw edges and turn right side out.
It should look like this:
I added a key ring to the 'tail' in case I wanted to add it to my purse, or key chain, or belt loop.

Tip of the day:
If your pencil's eraser gets all shiny and doesn't erase anymore, try to give it a bit of a filing with an emery board. This will shave off that shiny surface, and then you can erase that ONE little mistake you made (because you don't make a lot of them, right?  :)

That's all for this week...
:D

Friday, February 15, 2013

Infinity scarf

The weather has been pretty chilly lately, and I hate being cold around my neck, so I made a bunch of casual, cotton infinity scarves. Luckily my neighbor cleaned out his closet and I got some nice color variety. Scarves are a great way to add a little something extra to a plain outfit. And these simple loops go great with T-shirts and jeans.

Today's project is:

T-shirt Infinity Scarf

You will need:
a t-shirt, extra large is best
(You can find t-shirts at thrift shops, raid your neighbor's closet or buy them cheaply in a 3 pack at Walmart)
scissors

You will cut the bottom hem off the t-shirt. Then cut about 12"  - 14" up (approx.) This should be under the sleeves.

Then holding this round loop, put your foot down on the end, and pull and stretch the top upward. Be strong!
As you do this, the fabric will curl inward, so you don't need to hem this. The T-shirt fabric will not fray.

Now you have a naturally folded loop, double it up around your neck, and voila, instant fun accessory as well as keeping you cozy.

Use the rest of the shirt for rags. Cotton t-shirt fabric is nice and soft and absorbant.

tip of the day:
Buy some Altoid mints and save those great metal tins. They are good for so many things. Small sewing notions, travel jewelry case, store cards fit in them (how do we accumulate so many of those things?). If you need a small 'wallet', use one of these tins. Your credit card, coins and cash fit in nicely plus a couple of keys (without a big keychain). Stash in your pocket and off you go!

That's all for now...
:D

Friday, February 8, 2013

bottle gift bag

I was given a bag full of fabric samples, and each one had two grommets in them. So I put my brain to work, and came up with today's project of recycled fabric...
This can be used with wine bottles, olive oil, or flavored vinegars. It's a great hostess gift

Wine Bottle gift bag
you will need:
fabric, ribbon (about 18"), sewing machine or hand stitching

The sample was the perfect size for a wine bottle. But you could use these for olive oil or flavored vinegar, etc.  But the problem was that the grommets were too close to the top.  So I folded down the top and stitched the bottom edge. Also I stitched 1 inch above this to form a casing to put the ribbon through.

Then turn it inside out, and stitch along the side and bottom. Turn inside out and then take a ribbon, add a safety pin onto the end, and feed it through one of the grommets until you come to the second grommet and come out. Pull ribbon through until the ends meet.

When you go to a friend's for dinner, or for a special occasion, put a nice bottle of wine in here, tie ribbon tightly with a bow, and surprise your hosts with a wonderful, REUSABLE, bag. Or when you go to BYOB gathering, you can transport your wine in style. White, chilled wine will stay cooler longer and as it 'sweats' the bag will help with that.

(IF you don't have samples with grommets, you can use a piece of fabric, cut 15" x 13". Fold down the top, double and stitch a nice clean edge. Fold 'right sides in' and catch a ribbon, that has been folded in half, as you sew the side seam so when you turn it inside out, the ribbon will stick out and you can tie it up that way.)

today's tip is:
keeping a package of floss in your purse can come in very handy. Not only can you keep your teeth clean after meals out, but I have needed a string to tie something with in a pinch, and floss is strong and handy.

That's all for now...
Dee

Friday, February 1, 2013

Holy Pantelony

I have a favorite pair of jeans that I wear all the time. And unfortunately they have finally started to rip. Now I know, the rip and holes and frayed parts of jeans are popular right now. In fact, you buy them with the worn out parts already made. That's not for me. I tried wearing them with the long rip in the knee for a week, and couldn't get used to it.
So I am going back to the 70's
(in fact, fashion repeats itself every 20 years, so all this stuff if back 'in')
I had a pair of jeans that had so many embroidered designs on them, it was hard to find the denim.
Just kidding, but really hand sewing and embroidery are making a comeback. So today's project is right in time for...the time!

today's project is:
Embroidered jeans

Whether the rip is long, or wide or small, you can camophlage the area with a cute embroidered design. Mine was a long rip, so I chose a long stemmed flower to cover up the opening.
You will need:
embroidery thread, needle, scissors

When you buy the thread, it comes in 6 strands. You usually would separate this into two 3 strands each. If you slowly separate the threads (with the main unit squeezed between your knees) slowly pull the parts apart. Then thread the 3 strands onto the needle (with a larger eye) and knot the end (thread should be about 18").
Starting from the inside of the rip, work your up grabbing each side of the rip as you go keeping your stitches close to each other.
If you run out of thread, knot inside the pant leg.  And then start again until you have the opening covered. Be creative, use vines, birds, hearts, flowers, whatever! It is so much prettier than a gaping hole in your jeans!

tip of the day:
use your dryer sheeet to clean out the lint trap. This is important as too much lint build up can start a fire! eeks!
that's all for now....
Dee